November 18, 2025 · Kuba Rogut
Before you make your first cut, trim a silent pause, or apply that perfect fade, getting your setup right is the most important step you can take. When you edit a WAV file, you're working with the raw material—a lossless audio format.
Think of it like a photographer's RAW image file. It contains every bit of the original information, unlike a compressed format like MP3, which throws data away to shrink the file size. This pristine quality is why WAV is the gold standard in professional production; it gives you maximum headroom to edit without degrading the sound.
This commitment to quality means your initial setup really matters. You don't need a million-dollar studio, but a few key pieces will make all the difference in the world.
Your editing journey begins with the right gear. In the audio world, the saying "garbage in, garbage out" is the absolute truth. A clean, high-quality recording will always give you a better final product than trying to repair a noisy or distorted one later.
The screenshot below shows the straightforward interface of Audacity, a fantastic and free starting point for anyone looking to edit WAV files.
As you can see, everything you need—the waveform display, playback controls, and editing tools—is right there. It’s built for function, which makes it perfect for learning the ropes.
Picking the right software can feel overwhelming, but it really comes down to your needs and budget. Whether you're a hobbyist or a seasoned pro, there's a tool out there for you.
| Software | Ideal User | Key Strengths | Cost |
|---|---|---|---|
| Audacity | Beginners, podcasters, students | Free, open-source, great for basic editing and cleanup. | Free |
| Reaper | Hobbyists to professionals | Highly customizable, powerful, and very affordable. | ~$60 (Discounted) |
| Adobe Audition | Professionals, audio engineers, content creators | Deep feature set, seamless Adobe CC integration, advanced restoration tools. | Subscription |
| FFmpeg | Developers, technical users | Command-line tool for conversion, batch processing, and automation. | Free |
Ultimately, the best tool is the one that fits your workflow. Don't be afraid to start with something free like Audacity and move up as your skills and needs grow.
To edit like a pro, you need to speak the language. Two terms you’ll see everywhere are sample rate and bit depth. Getting a handle on these is fundamental to preserving the quality of your audio.
By grasping these fundamentals of digital audio, you're not just following steps; you're making informed decisions. This foundational knowledge is a core part of https://sfxengine.com/blog/what-is-audio-production and will serve you in every project you undertake.
Alright, this is where the real work begins and where your WAV file starts to sound like a finished product. The basic edits—trimming, fading, and leveling—are the absolute bedrock of professional-sounding audio. Honestly, these skills make up most of my day-to-day editing, turning raw, clunky recordings into something polished and ready to go.
When you get these fundamentals down, you can make a hesitant voice-over sound confident or a rambling interview feel tight and focused. It’s not about fancy, complicated effects; it’s about making smart, clean cuts that don’t waste the listener's time.
Every single recording has fat to trim. I’m talking about those long pauses at the start and finish, the awkward silences between sentences, and all the filler words we naturally use—the "ums," "ahs," and "you knows." Chopping these out is one of the quickest ways to instantly make your audio sound more professional and improve its flow.
Imagine a podcast interview. If the guest pauses for a few seconds to think, leaving that dead air in the final cut makes the whole conversation drag. A simple trim tightens things up, making both people sound more articulate and keeping the audience from getting bored. Your goal when you edit WAV files is to make these cuts totally invisible.
Here's how I approach this:
The real test is to listen back to your cut. Does it sound natural, or is there an abrupt jump? Sometimes, leaving a tiny fraction of a second of "room tone" before the next word can make all the difference in making the edit feel seamless.
You’ll constantly find yourself needing to combine different audio takes. Maybe you flubbed a line in a narration and re-recorded just that one sentence. If you just paste the new take in, you'll almost always get an audible "pop" or "click" at the edit point. Fades are your best friend here.
A crossfade is the go-to solution. It works by slightly overlapping the two audio clips, fading one out while fading the other in at the same time. The result is a transition so smooth the listener will never even know an edit was made. Even a ridiculously short crossfade of just 5-10 milliseconds can completely eliminate those harsh clicks.
This same logic applies to the very beginning and end of your entire audio file.
Think about a sound designer creating a monster's roar for a video game. A sudden start and stop would sound completely fake. By adding a quick fade-in and a slightly longer fade-out, the roar integrates much more naturally into the game's world.
Have you ever listened to a podcast where you're constantly reaching for the volume knob? One person is whispering, the next is shouting, and the intro music nearly blows your speakers. That's a classic sign of unleveled audio, and it's incredibly annoying for the listener. Your goal is to get a consistent, predictable volume level from start to finish.
Two main tools will get you there: gain and normalization.
Gain is just a simple volume control. You can manually boost or cut the gain of an entire clip to match its volume to the clips around it. It’s the most direct way to adjust levels.
Normalization, on the other hand, is an automated process that does the heavy lifting for you. You set a target peak volume—a common one is -1.0 dB—and the software raises the entire file's volume so its loudest point hits that exact target without clipping. It’s perfect for bringing a quiet recording up to a standard level without causing distortion. This is a non-negotiable step when you edit WAV files for distribution, ensuring they meet the loudness standards for platforms like Spotify or YouTube.
No matter how careful you are during recording, unwanted sounds have a way of creeping in. This is where we move beyond simple edits and get into the surgical work of audio restoration. These techniques are what separate "clean" audio from truly professional, polished results, and they can rescue a take you thought was unusable.
Think of it like digital archaeology. You’re carefully dusting away the modern debris—the hum of an air conditioner, the buzz of a guitar amp—to uncover the perfect recording that's buried underneath. These aren’t just blunt filters; they’re precise tools for solving specific problems.
One of the most common audio gremlins is a steady, constant background noise. We're talking about things like the low rumble of traffic, the hiss from a preamp, or the whine of a computer fan. You can’t just cut this out, because it’s baked into the entire recording. This is where a clever technique called noise profiling comes into play.
The process itself is brilliantly simple but incredibly powerful. You just need to find a small section of your recording that contains only the noise you want to get rid of. A few seconds of "room tone" before someone starts speaking is the perfect candidate.
Your audio software analyzes this little snippet to create a unique fingerprint of that unwanted sound. Once it knows what to listen for, it can intelligently subtract that specific noise from the rest of the track, leaving the good stuff—like someone's voice—almost completely untouched.
The key here is to be gentle. Pushing noise reduction too hard can create bizarre digital artifacts that make the audio sound "watery" or robotic. Always start with a light touch and slowly increase it until the noise is gone but the voice still sounds natural. For a much deeper dive, our guide on how to remove background noise from audio walks through this process in even more detail.
Pro Tip: Always, always record a few seconds of pure room tone before you start the main take. This gives you a perfect noise sample to work with later and can be a total lifesaver in post-production. It’s a simple habit that makes everything easier down the line.
Unlike a steady hum, some noises are sudden and isolated. These are the sharp clicks from a mouse, the pops from a dodgy microphone cable, or plosives—those distracting bursts of air from "p" and "b" sounds hitting the mic too hard. Fixing these requires a much more surgical approach.
Most professional audio editors have dedicated tools designed for this very job:
For the really stubborn sounds, sometimes you have to get your hands dirty. This means zooming way in on the waveform, visually finding the offensive spike, and manually redrawing that tiny section to smooth it out. It’s meticulous work, for sure, but it’s how you get that perfectly clean, flawless sound.
Sometimes the problem isn't an extra noise, but the overall tonal character of the recording itself. Maybe a voice sounds too "boomy" from being too close to the mic, or an instrument sounds thin and tinny. This is a job for an equalizer, or EQ.
An EQ gives you the power to boost or cut specific frequency ranges with precision.
Using an EQ is all about making small, corrective adjustments, not drastic, unnatural changes. It's like adjusting the focus on a camera to bring your subject into perfect clarity. It’s a subtle art, but mastering it can make a massive difference in the final quality of your audio.
Theory is great, but the magic really happens when you open up your editor and start making changes. Getting hands-on is where you’ll turn a raw audio file into something polished and professional. Let's walk through how to edit WAV files in some of the most common tools out there, from the free and friendly to the powerful and complex.
Each piece of software has its own personality and strengths. Whether you're doing a quick cleanup job on a voice-over or building an intricate soundscape, there’s a right tool for the job.
For so many people, Audacity is the perfect starting point. It’s free, it’s open-source, and it's more than capable of handling the essential editing tasks you'll face every day. You don't need a complicated program for straightforward work, and Audacity’s simple interface gets you from A to B without a fuss.
Let’s say you just recorded a 15-minute voice-over. The WAV file is solid, but there's a bit of background hiss and a couple of stumbles you want to remove. Here’s how you’d tackle it in Audacity:
This simple three-step workflow—clean, cut, and level—takes just a few minutes but makes a world of difference in the final quality.
The rise of accessible tools like Audacity has been a game-changer for independent creators. Its massive user base is a significant reason why the music editing software market is expected to hit USD 2.63 billion by 2034. With over 300 million downloads since it first launched, its impact is undeniable. You can dig into the numbers and trends in the complete music editing software market research.
When you’re juggling more than one audio file, it’s time to graduate to a Digital Audio Workstation (DAW). REAPER is a crowd favorite, packing professional-level power into a surprisingly affordable package. It’s built for multi-track editing, which is perfect for podcasters mixing dialogue, music, and effects, or sound designers layering dozens of sounds.
A DAW works non-destructively, meaning you can edit multiple layers at once without permanently changing the original files. Imagine editing a dialogue track while perfectly syncing a musical score on a separate track below it. This is where DAWs shine. If you're curious about your options, we've broken down some of the best audio editing software to help you choose.
Here's a peek at what a multi-track project looks like in REAPER, with different audio files stacked on top of each other.
This visual layout is incredibly intuitive for seeing how all your audio elements fit together over time, allowing you to craft a rich and dynamic mix.
If you're already in the Adobe Creative Cloud ecosystem, Adobe Audition is a no-brainer. Its killer feature is Dynamic Link, which creates a seamless bridge to Premiere Pro. You can send audio from your video timeline straight into Audition for serious repair work, and every change you make automatically syncs back.
Let's say a microphone in your video interview picked up a nasty electrical hum. In Audition, you can switch to the Spectral Frequency Display, which turns your audio into a visual heat map. This lets you see the hum as a distinct line and literally erase it without touching the speaker's voice. That kind of surgical precision is just not possible in a standard waveform editor.
Finally, for those who aren't afraid of a command line, FFmpeg is the ultimate power tool. It’s not for detailed, hands-on editing; its superpower is automation. FFmpeg lets you edit WAV files programmatically, which can save you an unbelievable amount of time on repetitive tasks.
Got a folder with 100 sound effects that all need to be trimmed to exactly three seconds and converted to a new sample rate? Instead of opening each one manually, you can write a single command to process the entire batch in seconds.
A basic FFmpeg command might look something like this:
ffmpeg -i input.wav -ss 00:00:01 -t 00:00:03 -c copy output.wav
This little script tells FFmpeg to take input.wav, start one second in, trim it to a three-second clip, and save it as output.wav. The -c copy part is key—it does all this without re-encoding, so you don't lose any quality. For anyone who manages large libraries of audio, learning a bit of FFmpeg is a total game-changer.
You’ve spent hours meticulously editing your audio—every trim, fade, and noise reduction has been deliberate. But all that hard work can be undone in a single click if you get the export settings wrong. Think of the export window as the final, crucial step where you lock in all that quality, ensuring your audio sounds exactly as intended wherever it’s played.
Before you even think about hitting that export button, though, let’s talk metadata. This is the digital equivalent of a label on a vinyl record, containing essential info like artist, title, and album. Properly tagging your files makes them professional, searchable, and ensures they display correctly in media players. It’s a small step that adds a huge layer of polish.
There's no such thing as a one-size-fits-all export setting. The destination for your audio dictates the "recipe" you need to use. Getting this right is the difference between a file that works flawlessly and one that gets rejected or sounds terrible.
Here are a few of my go-to recipes for common scenarios:
This infographic does a great job of visualizing how your end goal should influence your choice of editing software from the very beginning.
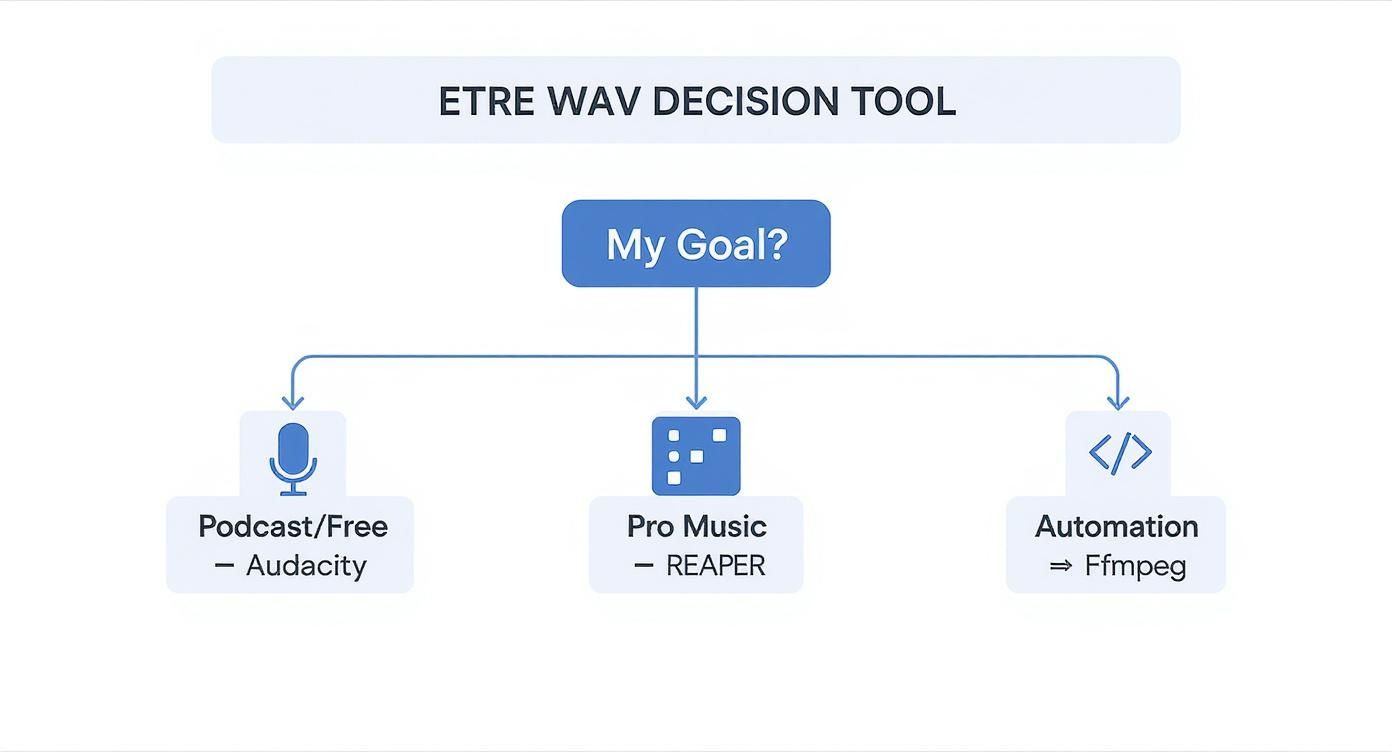
As you can see, choosing the right tool upfront saves a lot of headaches down the road, guiding you to the most efficient workflow for your specific project.
Ever heard of dithering? It's a crucial process you need to know about, especially when you’re reducing the bit depth of a file—like going from your 24-bit master down to a 16-bit file for a CD.
Without getting too technical, dithering adds a tiny, almost imperceptible layer of noise to the audio. This sounds counterintuitive, but this noise cleverly masks the harsh digital artifacts (called quantization errors) that can pop up in quiet passages when you lower the bit depth. Nearly all audio editors have a dithering option in the export menu; make sure you enable it when you're reducing bit depth.
Here's a pro tip: Dithering should only be applied once, right at the very end of your mastering chain, just before you export the final file. Applying it more than once can actually introduce unwanted noise.
The demand for these skills is growing fast. The global audio and video editing software market was valued at USD 7.03 billion and is projected to climb to an incredible USD 20.08 billion by 2032. This boom shows just how many creators are now producing professional-grade content. You can learn more about the global audio software market's trajectory and see where the industry is headed.
To help you get it right every time, here's a quick-reference table for the most common export settings.
| Use Case | Recommended Format | Bit Depth | Sample Rate | Notes |
|---|---|---|---|---|
| Archival Master | WAV or AIFF | 24-bit | 96kHz | Your highest quality version. Keep this safe! |
| CD Audio | WAV | 16-bit | 44.1kHz | The classic "Red Book" standard for audio CDs. |
| Podcast (Stereo) | MP3 | N/A | 44.1kHz | Use a bitrate of 320 kbps for best quality. |
| Podcast (Mono) | MP3 | N/A | 44.1kHz | 192 kbps is a great balance of size and quality. |
| Film & Broadcast | WAV | 24-bit | 48kHz | The professional standard for video projects. |
| Game Audio Loop | OGG Vorbis | N/A | 44.1kHz | Compressed format good for looping and saving space. |
| Web/Streaming | AAC or MP3 | N/A | 48kHz | AAC is often more efficient than MP3 at lower bitrates. |
Ultimately, exporting with confidence comes from knowing your destination's requirements. By choosing the right format, embedding your metadata, and applying finishing touches like dithering, you ensure every ounce of your hard work is heard exactly as you envisioned.
When you first start wrangling WAV files, a few key questions always seem to pop up. These are the sticking points I see people hit all the time. Getting these sorted out early will save you a world of frustration and help you build a much smarter workflow.
Nope. Editing a WAV file itself won't degrade the quality. Think of it this way: WAV is a lossless format, so when you're making basic edits like cutting, rearranging clips, or trimming silence, you're just shuffling around the original, high-quality data. You're not actually changing or re-compressing it.
The only time you risk losing quality is if you get too aggressive with certain effects (like over-the-top noise reduction) or—and this is the big one—when you export your final file to a lossy format like an MP3.
Here's a pro tip: always save your master project file in your editor's native format. On top of that, keep an archive copy of your final edit as a high-quality WAV. That way, you can always jump back to the pristine, original audio if you ever need to make more changes or export it for a different purpose down the road.
The crucial difference lies in the data you're starting with. A WAV file is like the original, unedited photograph—it contains every single piece of uncompressed audio information. An MP3, on the other hand, is a compressed, "lossy" copy. To make the file smaller, some of that audio data was permanently thrown away.
When you edit an MP3 and save it again, you're forcing it through another round of compression, which degrades the quality even more with every single save. For any kind of serious audio work, you absolutely have to start with a WAV or another lossless source file. It's the only way to maintain the highest possible fidelity from start to finish.
That large file size is a feature, not a bug! WAV files are uncompressed by design, and that's precisely why they preserve all the original audio data for maximum quality. For context, a standard stereo WAV file at CD quality (16-bit, 44.1kHz) will take up about 10 MB of space for every minute of audio.
This is exactly what you want for professional editing and archiving, as it gives you the complete sonic picture to work with. The standard professional workflow is to do all your heavy lifting—the editing, mixing, and mastering—in the WAV format. Only at the very end do you export a smaller, compressed version (like an MP3) for distribution or streaming.
Absolutely not. While professional suites like Pro Tools and Adobe Audition are incredibly deep, the free tools available today are more than powerful enough for most people's needs.
A program like Audacity is a fantastic open-source editor that can handle almost anything you throw at it:
For podcasters, indie game developers, and content creators, free tools provide all the muscle you need to produce professional-sounding audio without spending a single penny on software.
Ready to create the perfect sound effects for your projects without the hassle? SFX Engine offers a free, AI-powered sound effect generator that lets you craft unique, royalty-free audio with simple text prompts. Generate everything from rolling thunder to ambient Foley and elevate your work today. Get started for free.