December 14, 2025 · Kuba Rogut

Failure sound effects are those little audio cues that tell you something went wrong. Think of a simple buzz, a dull thud, or even that classic, comical trombone slide. These sounds are more than just noise; they're a core part of user feedback in games, apps, and just about any interface, letting you know instantly that an action wasn't successful.

It’s tempting to think of a failure sound as just a simple “bonk” and move on, but its impact on the user experience is huge. A thoughtfully designed failure sound is a critical piece of communication. It guides people through an interface or a game, helping them learn the rules without getting frustrated. This feedback taps directly into our psychology, helping us learn from our mistakes and course-correct on the fly.
The right sound also sets a specific emotional tone that should match your project's vibe. For example, that silly "wah-wah" trombone in a casual puzzle game lightens the mood after a wrong move, making players want to try again. On the other hand, a sharp, jarring alert in a productivity app signals that an invalid entry is a serious issue, preventing potential data loss.
Our brains process sound faster than visual information, which makes audio cues incredibly powerful for instant feedback. When you perform an incorrect action and immediately hear a sound, your brain instantly connects the two. It's a fundamental principle of good user experience design.
This isn't just a hunch; it's backed by cognitive psychology. You'll find audible indicators in the vast majority of failure events in modern video games and apps. In fact, studies show that designers add explicit negative-feedback sounds in roughly 60–80% of fail states to make sure the player understands what happened. This immediate feedback helps cut down on confusion and can shorten the time it takes for a user to recover from an error by about 15–30% compared to just letting the failure happen in silence. You can find more deep dives into audio industry trends on Startus Insights.
A great failure sound doesn't just say "you're wrong." It says "try this instead" or "that's not quite right" in a way that feels helpful, not punishing. It’s the difference between a good teacher and a harsh critic.
Beyond just telling a user they made a mistake, failure sounds are key to managing their expectations and reinforcing your brand's personality. Just think about how different types of sounds make you feel.
The emotional impact of a sound can be tailored to fit the context perfectly. A harsh, metallic clang might be ideal for a mechanical failure in a sci-fi game, while a gentle, apologetic chime works better for a simple form-field error. The table below breaks down a few common sound types and the feelings they typically evoke.
| Sound Type | Common Instruments/Sources | Typical Emotional Response | Best Use Case |
|---|---|---|---|
| Glitch/Static | Synthesizers, white noise, bit-crushing effects | Digital, modern, jarring, technical error | UI errors in tech apps, sci-fi games, system alerts |
| Dull Thud/Bonk | Muted percussion, woodblocks, Foley sounds | Low-stakes, neutral, physical mistake, "oops" | Simple puzzle games, form validation, casual apps |
| Comical/Whimsical | Trombone slide, slide whistle, "boing" spring | Humorous, lighthearted, forgiving | Children's games, casual mobile apps, creative tools |
| Dissonant Chime | Dissonant synth pads, detuned bells | Negative, serious, warning, requires attention | Financial software, critical system errors, productivity apps |
| Buzz/Error Tone | Square wave synth, harsh buzzer | Urgent, annoying, direct, unambiguous | System-level alerts, hardware errors, industrial interfaces |
Ultimately, choosing the right sound is about understanding the user's emotional state at that moment of failure.
By carefully selecting the character of your failure sound effects, you're actively shaping the user's entire journey. That sound becomes part of the conversation between your product and the person using it, creating an experience that feels far more intuitive and emotionally intelligent.
Ever wonder what separates a generic error beep from an iconic "game over" sound that sticks with you for years? It's not magic. Like a chef building a recipe, a sound designer intentionally combines specific acoustic ingredients to make you feel something.
Let's break down those core ingredients: pitch, timbre, and duration. Mastering how these three elements work together is the key to creating audio feedback that's clear, effective, and perfectly in sync with the emotional tone of your project.
First up is pitch, which is just the highness or lowness of a sound. In Western music and culture, we're hardwired to associate falling pitches with negative outcomes. Think of the classic "womp womp" of a sad trombone—it's a near-universal sign for failure. That's why so many classic error alerts and game-over jingles feature a melody or harmony that trends downward.
Then you have timbre, which is the unique character or texture of a sound. It's the reason a trumpet and a violin sound completely different, even when playing the same note. For failure sounds, timbre is all about personality.
You can even see what these qualities look like. This waveform visualizer gives you a graphical representation of the sound itself.
The shape, density, and complexity of these waves are a direct visual translation of the pitch and timbre we hear. It’s a way to "see" the sound you're creating.
A powerful trick of the trade is to use dissonance. By layering notes that clash harmonically, you create an immediate sense of tension and unease. It's an acoustic red flag that instantly tells the listener, "Whoa, something's not right here."
How long your sound effect lasts is just as critical as what it sounds like. Duration tells the user how serious the failure is.
For a minor mistake—like typing a forbidden character into a username field—you want something short and sharp. A quick, percussive sound under 250 milliseconds provides instant feedback without derailing the user's focus. It's a gentle nudge, not a full-blown interruption.
On the other hand, a major event demands more sonic real estate. Think of a "Game Over" screen or a critical system failure. These moments need a longer sound, maybe one to two seconds, to convey weight and finality. These sounds often have a noticeable decay or "tail," letting that feeling of failure hang in the air for just a moment to make sure the message has landed. The goal is simple: match the sound's presence to the magnitude of the moment.
This is where the magic happens—where those abstract ideas of clicks, buzzes, and sad trombones become actual audio files you can use. Working with an AI-powered sound effects generator is a total game-changer. Forget about spending hours digging through generic libraries for a sound that’s "close enough." Now, you can create something specific and unique that’s a perfect fit for your project.
The secret isn't just using the tool; it's how you talk to it. Simply typing "error sound" might get you a basic beep, but it won't have any character. The real power is in writing descriptive prompts that paint a picture for the AI, telling it exactly the feeling you're trying to capture.
Treat your prompt like a creative brief for a sound designer. The more vivid detail you give, the closer you'll get to what's in your head. Try to include words that describe the texture, the emotion, and even the physical action you’re imagining.
Let’s look at a few examples. Instead of a generic "game over," you could try:
See the difference? These prompts give the SFX engine specific sonic ingredients—texture (crunchy, watery), instruments (trombone, xylophone), and actions (deflating, popping). That detail is what turns a forgettable sound into a memorable one. You can start experimenting with prompts like these yourself using a powerful AI sound effect generator.
Once your prompt gets you in the ballpark, the real refinement begins. Most SFX engines let you tweak key parameters to polish the sound without starting from scratch. Getting comfortable with these controls is what separates a good result from a great one.
These parameters directly shape the core building blocks of your sound.
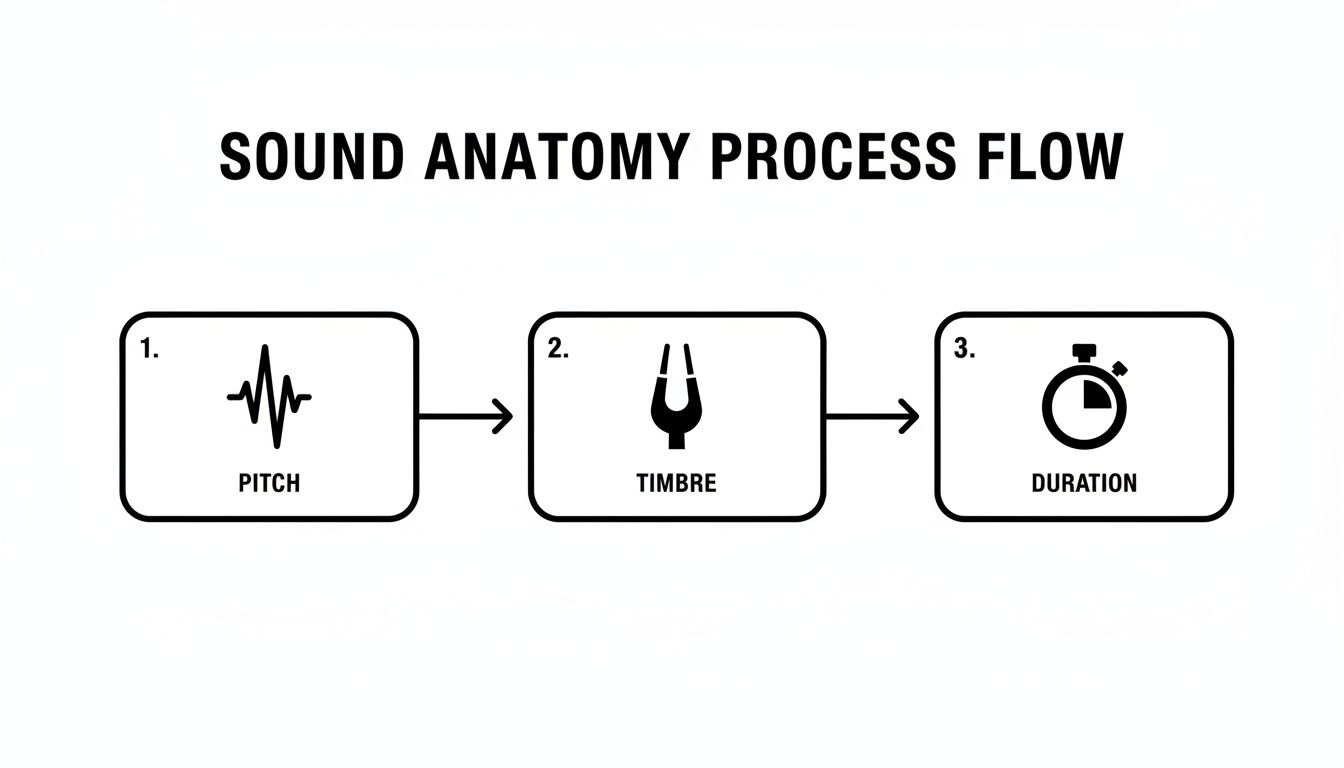
As the flowchart shows, elements like pitch, timbre, and duration are the fundamental DNA of any sound you create.
Adjusting these settings gives you direct control over the character of your failure sound. For example, duration is critical; a quick, short sound is perfect for a minor error because it doesn't interrupt the user's flow.
Another incredibly useful tool is randomness (sometimes called "variation"). Cranking this up will give you multiple unique takes from the exact same prompt. This is a lifesaver for avoiding that robotic, repetitive feel when a player makes the same mistake over and over.
Pro Tip: Always generate several variations of the same core sound. Even tiny differences in pitch or texture can make the experience feel far more organic and less mechanical, especially in games where failing is part of the fun.
Finally, look for a style parameter. This can instantly guide the AI’s overall vibe. Choosing "8-bit" will get you that classic, chiptune feel, whereas "cinematic" will deliver something much more dramatic and polished. The best way to learn is to just jump in and play with these settings—it's the fastest path to finding that perfect sound.
An AI-generated sound is a fantastic starting point. It gives you a unique sonic foundation to build on, but the real magic, the professional polish, happens inside your Digital Audio Workstation (DAW). This is where you’ll take that raw audio file and transform it into a crisp, impactful asset ready for any project.
Think of the sound you just generated as a rough-cut gem. It has character and potential, but the fine-tuning is what makes it shine. Post-processing in a DAW lets you carve out the details, add depth, and make sure your sound sits perfectly in the final mix of a game, app, or film.
The first stop for me is almost always the equalizer, or EQ. An EQ is your sonic scalpel, letting you boost or cut specific frequencies to shape the sound. With many failure sound effects, especially digital glitches or mechanical noises, you often get unwanted low-end rumble or a harsh, fizzy high-end that can make the final sound muddy or just plain annoying.
A simple high-pass filter can work wonders. By cutting everything below 80-100 Hz, you can instantly clean up bass frequencies that add mud without contributing to the core of the sound. On the other end, a low-pass filter can gently roll off some of the piercing high frequencies that might fatigue the listener’s ears.
Pro Tip: Before you start boosting frequencies to make things stand out, try cutting unwanted ones first. You’d be surprised how often removing a muddy frequency range makes the good parts of the sound feel clearer and more present without touching the volume knob.
You don't need a high-end, expensive setup to do this. Most DAWs come with a perfectly capable built-in EQ. If you're just starting out and need some guidance on what software to pick, our digital audio workstation comparison guide can help you find the right fit.
Once the sound is clean, it's time to give it some punch. This is where a compressor comes in. A compressor’s job is to reduce the dynamic range of a sound—in simple terms, it makes the loud parts a bit quieter and the quiet parts a bit louder. For a failure sound, this is key to creating a tight, consistent, and professional result.
For a sharp, percussive failure sound, I usually start with a slower attack (maybe around 20-30ms) and a faster release. This really emphasizes that initial impact and can take a good sound effect and make it feel truly great.
Here's where things get really fun. Layering is exactly what it sounds like: combining two or more different sounds to create a single, richer sound effect. A single AI-generated sound might feel a little thin on its own, but when you combine it with another element, it can become something truly special.
Don't be afraid to experiment. Try some of these combinations:
When you’re layering, remember to use EQ on each individual track to carve out space for the others. If two sounds are both heavy in the mid-range, they’re going to fight each other and sound muddy. Try cutting the mids in one sound to make room for the other. This little bit of housekeeping ensures each layer is heard clearly and helps everything meld into a cohesive, professional failure sound effect.
You've crafted the perfect sound, polished it in your DAW, and now you’re at the finish line: getting it into your actual project. It’s easy to overlook this stage, but proper implementation is what ensures all your hard work translates into a seamless experience for the player, user, or viewer.
This isn't just a simple drag-and-drop. We need to think like an implementer. Making smart technical choices upfront, like picking the right file format and sticking to a clean naming system, will save you—and your team—countless headaches down the road. This is where your sound officially leaves the studio and enters the real world.
First things first, what kind of file should you be exporting? In the world of game development and interactive media, the two main contenders are .WAV and .OGG. They each have their place.
A .WAV file is the gold standard for quality. It’s uncompressed, meaning every single bit of the original audio data is preserved. This purity makes it perfect for short, punchy sounds that need to fire instantly without any lag or artifacts—UI clicks, weapon shots, and, of course, our failure sounds. The only trade-off is the larger file size.
On the flip side, .OGG (specifically Ogg Vorbis) is a compressed format. It works by cleverly shaving off audio data that's less perceptible to the human ear, which dramatically shrinks the file size. You can see up to a 10:1 reduction compared to a WAV file. This makes it a no-brainer for longer audio like background music, ambient soundscapes, and lengthy dialogue, where file size is a major concern.
For most failure sounds, which are usually short and need to be crisp and immediate, .WAV is the professional standard. You get pristine, uncompromised quality, and for a sound that's only a second or two long, the file size is totally manageable in any modern project.
Okay, you've picked a format. Now, how do you name the file? This might seem trivial, but trust me, it's a huge deal. A project folder cluttered with names like error_final_v2.wav and new_sound_1.wav is a developer's nightmare and a recipe for mistakes.
A logical, consistent naming convention is your best friend. It makes assets easy to find, understand, and implement. A structure I've had a lot of success with is Category_Descriptor_Variation.format.
Let's break that down:
SFX, UI, Music, VoiceFailure, Success, Click, OpenDigitalGlitch, SoftChime, 01, 02Putting it all together, a file name like SFX_Failure_DigitalGlitch01.wav tells anyone on the team exactly what the sound is and what it's for at a single glance. No guesswork needed. If you're building out a full audio library, you can learn more about this in our guide to creating sounds for games.
Finally, let's talk about the legal stuff: licensing. It’s a crucial topic that protects both you and other creators.
If you made the sound entirely from scratch using SFX Engine, you own it. Simple. But if you’re incorporating sounds from other libraries or creators, you absolutely need to understand their license.
Here are the most common types you'll encounter:
Respecting intellectual property is non-negotiable. And on a more technical note, ensuring your files play nicely within the game engine is just as important. Knowing about converting audio files without losing quality can be a lifesaver when you need to make sure your failure sound effects are optimized for performance. By handling these final steps with professional care, you ensure your sound is not only effective but also implemented legally and efficiently.
When you're deep in the weeds of audio design, even something as specific as a failure sound effect can raise a lot of questions. I get these all the time from developers and fellow designers, so let's clear up some of the most common ones.
This is all about context. The volume of a failure sound has to walk a fine line—it needs to be clear enough to register, but not so loud that it annoys or startles the user.
A good starting point is to mix it just a bit louder than the ambient background audio but noticeably quieter than critical alerts or spoken dialogue. For instance, an error beep in a calm productivity app can be very subtle. But if you’re designing for a chaotic, action-packed game, that sound needs more punch to cut through everything else happening on screen.
A word of advice from the trenches: never let a failure sound be the loudest thing in your mix. Its job is to inform, not punish. Nothing makes a player hit the mute button faster than a piercingly loud "you messed up" sound.
Absolutely! In fact, it often should be, depending on the project. The emotional tone has to align with the experience you're building.
A quirky "boing" or a classic sad trombone can be perfect for a casual mobile game where failing is part of the fun. It takes the sting out of making a mistake and keeps the mood light.
That said, you wouldn't want that same sound when a credit card transaction fails in a banking app. For serious applications, a neutral, clean tone is non-negotiable. It has to communicate the gravity of the error without adding any emotional baggage.
For short, impactful sounds like this, .WAV is king. Most failure effects are less than two seconds long, and the uncompressed quality of a WAV file gives you that crisp, instant playback you need. There's no latency or compression artifacting to worry about.
Yes, the file size is a bit larger, but for such a short clip, it’s a tiny price to pay for pristine audio quality.
Save your compressed formats like .OGG for longer files—think background music or looping ambient tracks where file size really starts to matter. For that sharp, immediate feedback of a failure state, stick with WAV.
Tired of scrolling through sound libraries for something that's almost right? SFX Engine lets you generate the exact custom, royalty-free audio you need from a simple text prompt. Create the perfect failure sound for your project in seconds. You can get started for free over at sfxengine.com.