October 28, 2025 · Kuba Rogut
Learning how to make your own sound effects really comes down to a simple, creative loop: first, you describe the sound you have in your head, then you generate it with a tool like SFX Engine, and finally, you layer it with other sounds to bring it to life. This is how you move from just pulling from generic audio libraries to actually crafting a unique sonic identity for your projects.
In a world drowning in content, unique audio is often the one thing that makes a project memorable. Think about the last film, game, or podcast that really pulled you in—I’d bet its sound design was a huge part of that experience. We’ve all heard those generic stock sounds that can instantly make a production feel cheap or amateurish.
Custom audio, on the other hand, creates a signature experience. It’s the difference between a generic thud and the specific, bone-jarring impact of a giant’s club splintering against a stone floor. That level of detail is what builds true immersion and connects with an audience on an emotional level.
The market is definitely shifting to value high-quality, bespoke audio more than ever. The global sound effects services market was valued at a whopping USD 2.5 billion in 2023 and is on track to nearly double. This explosion is fueled by the growing need for immersive audio in films, games, and VR—especially as formats like Dolby Atmos become the new standard.
But this demand isn't just for big-budget studios. Independent creators are quickly realizing that custom sound gives them a serious competitive edge.
By creating your own sounds, you're not just adding audio to a scene; you're building a unique sonic world that is entirely your own. This is where your creative voice truly shines.
The benefits of crafting your own sound effects go way beyond just quality. It's about building a consistent and recognizable brand.
This mindset can be applied to all sorts of projects. For instance, you could elevate the experience by integrating unique sound effects into custom prerolls for your media server. At the end of the day, learning how to make a sound effect is a skill that will elevate every single project you touch.
The secret to getting incredible audio from an AI sound generator isn't about some hidden setting—it's all in the prompt. This is where your creative vision gets translated into instructions the AI can actually understand. The biggest leap you can make is to stop thinking like you're typing into a search bar and start thinking like a sound designer. "Explosion sound" won't cut it.
So, where do you start? I always come back to three core elements: the action, the material, and the environment.
Nailing these three things gives the AI the context it needs to move beyond generic sounds and create something truly believable.
Let’s put this into practice. Imagine you’re working on a sci-fi game and need a laser sound. Your first instinct might be to just type "laser sound." You'll get something, sure, but it will probably be forgettable.
Let's build that out.
First, what kind of laser is it? Maybe it’s a "plasma beam" or a "thin, high-frequency energy pulse." Describing the character and texture of the sound is a game-changer.
Next, think about the action. Is the laser "firing," "charging up," or "ricocheting off a metal wall"? Each verb suggests a completely different audio event.
Finally, give it a home. A laser in "deep space" should be clean and sterile with no echo. But that same laser firing inside a "metallic hangar" would have sharp, clanging reverberations.
Pro Tip: A vague prompt like 'laser sound' forces the AI to make all the creative decisions for you. A detailed prompt like 'A heavy, crackling plasma beam firing in a cavernous, metallic hangar' puts you back in the director's chair.
This is how you get a sound effect that doesn’t just fill a space but actually enhances the atmosphere of your project.
To really see the difference, let’s look at how adding layers of detail transforms a simple idea into a rich, specific sound effect. The advanced prompts below aren't just longer—they paint a complete sonic picture for the AI to work from.
| Desired Sound | Basic Prompt | Advanced Prompt | What the Detail Adds |
|---|---|---|---|
| Footstep | footstep sound | Heavy leather boot stomping on loose gravel in a quiet alley | Adds weight, texture, and a clear environmental context with echoes. |
| Whoosh | whoosh sound | A fast, ethereal whoosh with a shimmering tail of magical sparkles | Introduces a magical, otherworldly quality beyond a simple air movement. |
| Impact | punch sound | A heavy, wet punch hitting a leather bag, with a slight grunt | Creates a more visceral, realistic impact with both texture and human effort. |
As you can see, the more specific you are, the better your results will be. This is a skill that gets better with practice.
If you're looking for more inspiration or want to dive deeper into the art of prompt writing, exploring AI prompt library resources can be a huge help. You can also find more techniques in our guide on how to https://sfxengine.com/blog/create-sound-effects-online. Honestly, getting good at this is the single fastest way to level up your sound effects.
Your prompt is the blueprint, but the parameters are your power tools. Getting that first version of a sound is a great starting point, but the real magic happens when you start playing with the settings. Don't think of it as a final command; see it as the beginning of a conversation with the AI.
In a tool like SFX Engine, you’ll find a few key sliders that can completely change your audio. Getting comfortable with these is how you move beyond the AI’s first guess and start sculpting the sound yourself.
While the interface might vary from tool to tool, most AI sound generators are built around a few common parameters. Understanding what each one does is the key to getting what you want without rewriting your prompt a dozen times.
Let's break down the most important ones you'll run into:
Here's a pro tip: when you feel stuck, just max out the randomness and generate a handful of versions. You might stumble upon a totally new direction for your sound that’s way better than what you first imagined.
Okay, let's put this into practice. Imagine you need a sound for a magic spell. Your prompt is: A shimmering, ethereal magical healing spell being cast.
Now, watch how we can use parameters to shape this for different moments in a game or film:
See how the same prompt can create totally different emotional textures? This back-and-forth process of tweaking and regenerating is at the heart of how modern sound design works. Honestly, the ability to iterate this quickly is a huge leap forward, especially as AI gets baked into more audio tools. This is a massive win for creating personalized audio in immersive fields like VR and AR, which you can see in some of the latest audio industry trends.
Remember, generating multiple variations isn't a failure—it's just part of the process. Don’t settle for the first thing the AI spits out. Play with the sliders, explore the possibilities, and keep refining. That hands-on approach is what separates good sound design from great sound design.
A single, isolated sound effect almost never cuts it. Think about the most memorable sounds you’ve heard in movies or games—that bone-crunching punch, the starship's engines firing up. Those are rarely single recordings. They're carefully crafted composites, a blend of multiple audio layers that work together to create something truly immersive.
This layering technique is how we, as sound designers, build texture and realism. It’s how we turn a simple noise into a story.
Let's get our hands dirty and build a complex sound from the ground up: a robotic monster footstep. Instead of trying to nail it in one go with a single prompt, we'll break it down into smaller, more manageable pieces. This is how the pros do it.
Before touching any software, just close your eyes and listen. What does a giant robot footstep really sound like? When I do this, I hear at least three distinct things happening.
By deconstructing the sound into these core pieces, we've just created our roadmap. Now we can use a tool like SFX Engine to generate each element with a highly specific prompt, knowing we'll combine them later.
This simple diagram shows how these separate pieces come together to form the final product.
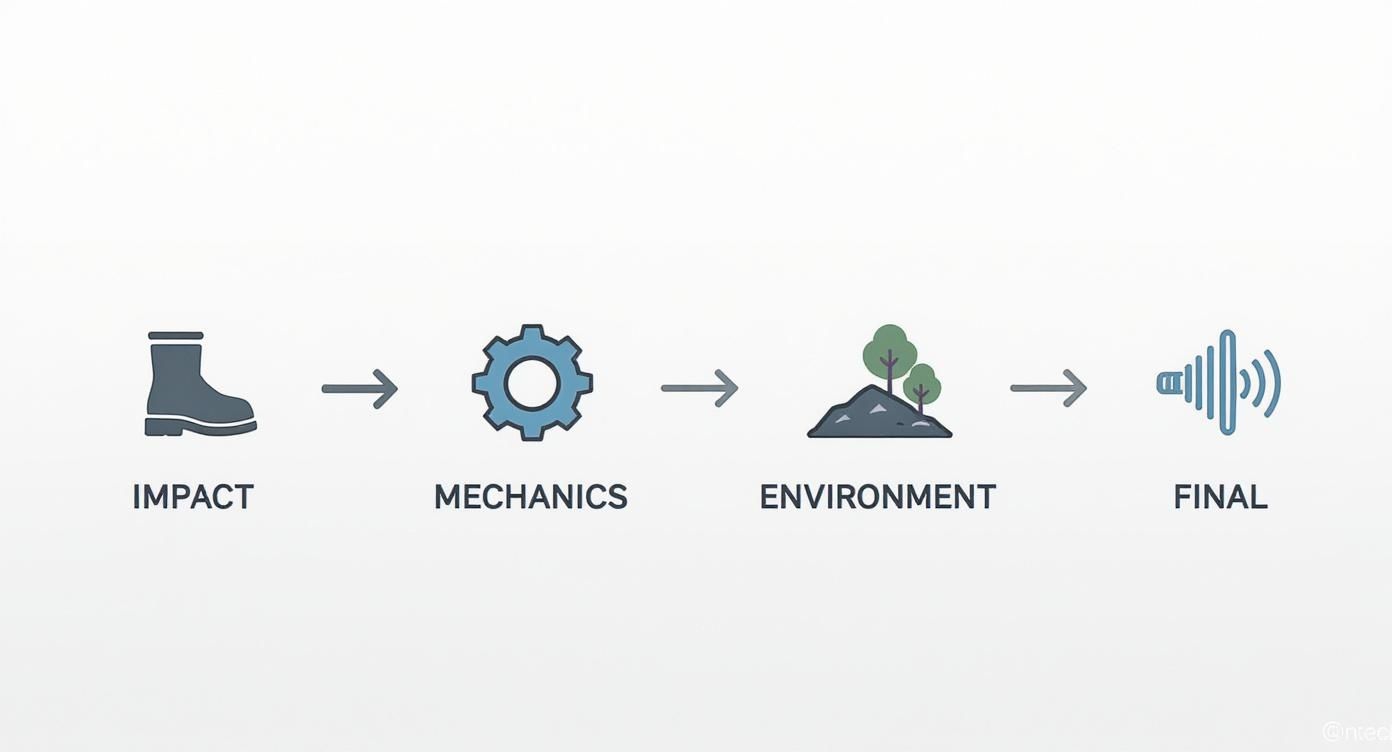
As you can see, the final, rich sound effect is really just a sum of its parts. Each layer has a specific job to do.
Alright, you've got your audio files: the stomp, the servo noise, and the gravel crunch. The next step is to fire up your audio or video editor and start arranging them. The key isn't just to pile them on top of each other; it's about making them feel like a single, cohesive event.
This is where timing becomes everything. Maybe the servo whir starts a fraction of a second before the main stomp, hinting at the leg moving into position. The gravel crunch, on the other hand, needs to hit at the exact same moment as the impact to feel connected.
Don't just stack your sounds—stagger them. A slight offset of even a few milliseconds between layers can create a much more natural and dynamic feel, preventing the sound from feeling flat and artificial.
Finally, you need to mix the levels. The metallic stomp is our star player, so it should be the loudest and most prominent element. The mechanical sounds and the environmental crunch are supporting actors; they should be tucked underneath the main impact to add flavor without stealing the show.
Think about it like layering a water splash sound effect. The initial, powerful splash is the main event, while the softer drips and ripples that follow just add to the realism.
This is the fundamental workflow. Once you get the hang of deconstructing and reassembling sounds, you can create virtually anything you can imagine, no matter how complex it seems.
You’ve generated and layered your sounds, but the real magic happens in the final touches. This is where we take a good sound and make it great. Don't worry, you don't need to be a professional audio engineer for this part; these are simple, high-impact edits that make all the difference.
The quickest win is trimming silence. Most generated clips have a little dead air at the start or finish. Just snip it away. This ensures your sound effect fires at the precise moment it should, making it feel tight and responsive in your project.
Next up, smooth out the edges. A sound that starts or stops abruptly can be really jarring. A quick fade-in at the beginning and a fade-out at the end—we're talking just a few milliseconds—can work wonders. It removes those harsh digital clicks and helps the sound blend naturally into whatever else is going on.
Equalization, or EQ, might sound complex, but it's really just a volume knob for different frequencies. A few thoughtful tweaks here can add serious clarity and punch, helping your sound cut through the mix without being obnoxious.
One of the most useful tricks is applying a high-pass filter. This simply cuts out the unnecessary low-end rumble that can make your audio sound muddy, especially when you mix it with music or dialogue.
Think about a sword clash. It doesn't need deep bass. By rolling off that low-frequency rumble, you let the sharp, metallic highs really sing. The impact feels crisper and more defined. It’s a perfect example of how removing something can actually improve the final sound.
Here’s how you could apply this to a few different effects:
This final editing stage is where the last 10% of effort yields 90% of the result. These small adjustments are what truly separate amateur audio from professional, polished sound design.
You've nailed it. You've crafted the perfect sound effect, but don't celebrate just yet. The final step—exporting—is where your hard work either shines or falls flat. Get the settings wrong, and you could end up with a muddy, compressed mess or a file so huge it breaks your project. This last part is all about preserving quality and making sure your sound works perfectly wherever it's headed, be it a game, a film, or a web app.
Your first big decision is the file format. Think of it like choosing between a massive, high-resolution photo print and a smaller JPEG optimized for a website. They both have their purpose, and the right choice depends entirely on the job at hand.
You'll almost always be choosing between two formats: WAV and MP3. They couldn't be more different.
A WAV file is your master copy, the gold standard. It's uncompressed and lossless, which means it holds every single bit of the original audio data just as you created it. For anything where sound fidelity is non-negotiable—like a feature film or a high-end video game—WAV is the only way to go.
An MP3, however, is all about being lean and efficient. It uses lossy compression to dramatically shrink the file size. This is a lifesaver for web applications, mobile games, or podcasts where quick load times are king. The trade-off is a slight dip in audio quality, but honestly, for many applications, you'd be hard-pressed to hear the difference.
The format you choose directly shapes the user's experience. A flawless WAV file is worthless if it makes a mobile game lag, but a low-quality MP3 can completely shatter the immersion in a cinematic scene. Always match the format to the medium.
When you're ready to export, don't get bogged down in a sea of technical jargon. For 99% of use cases, sticking to a few core settings will give you fantastic, reliable results. Think of this as your universal checklist for compatibility.
Getting this final step right is just as important as the creative work that came before it. If you need more tips on handling your audio files, take a look at our guide on how to download sounds and keep your library organized.
When you're just starting out in sound design, a few questions always pop up. It's totally normal. Tackling these early on is the best way to clear the path so you can really get into a creative groove. Here are the answers to some of the most common questions I get asked.
My advice is always to start small and specific. Don't try to score a whole movie scene on day one. A fantastic first project is to design the UI sounds for a fictional app. Think about all the little clicks, notifications, and swipes. These are short, contained, and they teach you a ton about creating a cohesive sound palette.
Another great exercise? Find a short, muted video clip online and create all the sound for it. I'm talking about simple actions like a door creaking open, someone setting a glass on a table, or the soft rustle of a page turning in a book. This forces you to nail the fundamentals—timing and layering—without getting bogged down.
The secret sauce is imperfection. Sounds in the real world are messy and rarely perfect, and that's what makes them feel real. When you're writing your prompts, try adding descriptors that introduce a bit of character. Think words like 'slight rattle,' 'faint background buzz,' or 'worn-out engine.' You’re essentially giving the sound a backstory.
Here’s my go-to trick: layer the AI-generated sound with something organic. I mean something you recorded yourself, like the subtle sound of your own breath or the rustle of a t-shirt. Placing that quietly underneath a generated 'whoosh' or 'impact' adds a dose of realism that AI just can't replicate on its own.
And don't just generate once! Always create several variations from the same prompt. You might get four so-so results, but that fifth one could be pure gold. The magic is often in the experimentation.
Nope, not at all. While the big professional Digital Audio Workstations (DAWs) are amazing, you can get professional-level results with free software. Seriously.
The barrier to entry for creating incredible sound has never been lower. You've got everything you need to get started right now.
Ready to stop hunting for the perfect sound and just create it yourself? With SFX Engine, you can generate custom, royalty-free sound effects in a matter of seconds. Sign up for free and start building your own unique audio world today.