February 11, 2026 · Kuba Rogut
Think of an audio compressor as an incredibly fast, automatic volume knob. Its core job is to manage dynamic range—that's just the technical term for the gap between the quietest and loudest moments in your audio. By tightening up that range, you get a smoother, more professional sound where nothing is painfully loud or frustratingly quiet.
Have you ever watched a movie where you can barely hear the dialogue, so you turn it up, only to be blasted out of your seat by the next explosion? That constant battle with the volume remote is exactly what compression solves. It’s like having an invisible audio engineer instantly turning down those loud parts and bringing up the quiet ones for you.
This single process is one of the most essential tools in modern audio production. It doesn't matter if you're mixing a song, editing a YouTube video, or producing a podcast; compression is what helps you create a balanced, professional-sounding final product. Without it, vocals would disappear in a busy mix, or a sudden sound effect could completely drown everything else out.
Ultimately, compression is all about control. When you learn to tame those unpredictable volume peaks and lift the quieter, more subtle details, you can make sure every element in your project has its own space and can be heard clearly. Getting a handle on this is a massive leap forward in producing great-sounding audio.
By managing dynamic range, compression allows a track's average volume to be increased without clipping, making it sound more present and energetic to the listener.
Mastering this tool is a huge part of learning how to improve audio quality and sound like a pro podcaster. The benefits are immediate and apply to pretty much any audio you'll ever work on:
To put it all in one place, here’s a quick summary of what we're talking about.
This table breaks down the fundamental job of a compressor and the main controls you'll use to get the sound you want.
| Concept | What It Does | Primary Goal |
|---|---|---|
| Compression | Automatically reduces the volume of sounds that go above a certain level. | To reduce the dynamic range for a more consistent volume. |
| Threshold | The volume level (in dB) at which the compressor starts working. | To set the point where loud sounds get turned down. |
| Ratio | How much the volume is reduced once the signal crosses the threshold. | To control the intensity of the volume reduction. |
| Attack | How quickly the compressor starts reducing the volume. | To shape the initial "punch" or transient of a sound. |
| Release | How quickly the compressor stops working after the sound drops back below the threshold. | To control how the sound "breathes" and recovers its volume. |
These are the core building blocks you'll be working with. We'll dive much deeper into what each one does very soon.
Taming audio dynamics is nothing new, but digital technology put these powerful tools into everyone's hands. The journey really kicked off in 1979, when a team led by Professor Dieter Seitzer developed the first digital signal processor that could handle audio compression.
A student on that team, Karlheinz Brandenburg, used ideas from psychoacoustics—the study of how we perceive sound—to figure out which parts of an audio signal could be thrown away without us really noticing. This groundbreaking research paved the way for the MP3 format in 1991, which could shrink audio files by a staggering 90-95% compared to the original, uncompressed versions. It completely changed the game for digital music.
Every audio compressor you’ll ever touch, whether it's a sleek software plugin or a dusty piece of vintage hardware, is built around five core controls. Getting a feel for these knobs and sliders is the first real step toward mastering compression. Think of them as the control panel for sculpting the dynamics of your sound.
The whole point is to manage the difference between the quietest and loudest parts of a track.
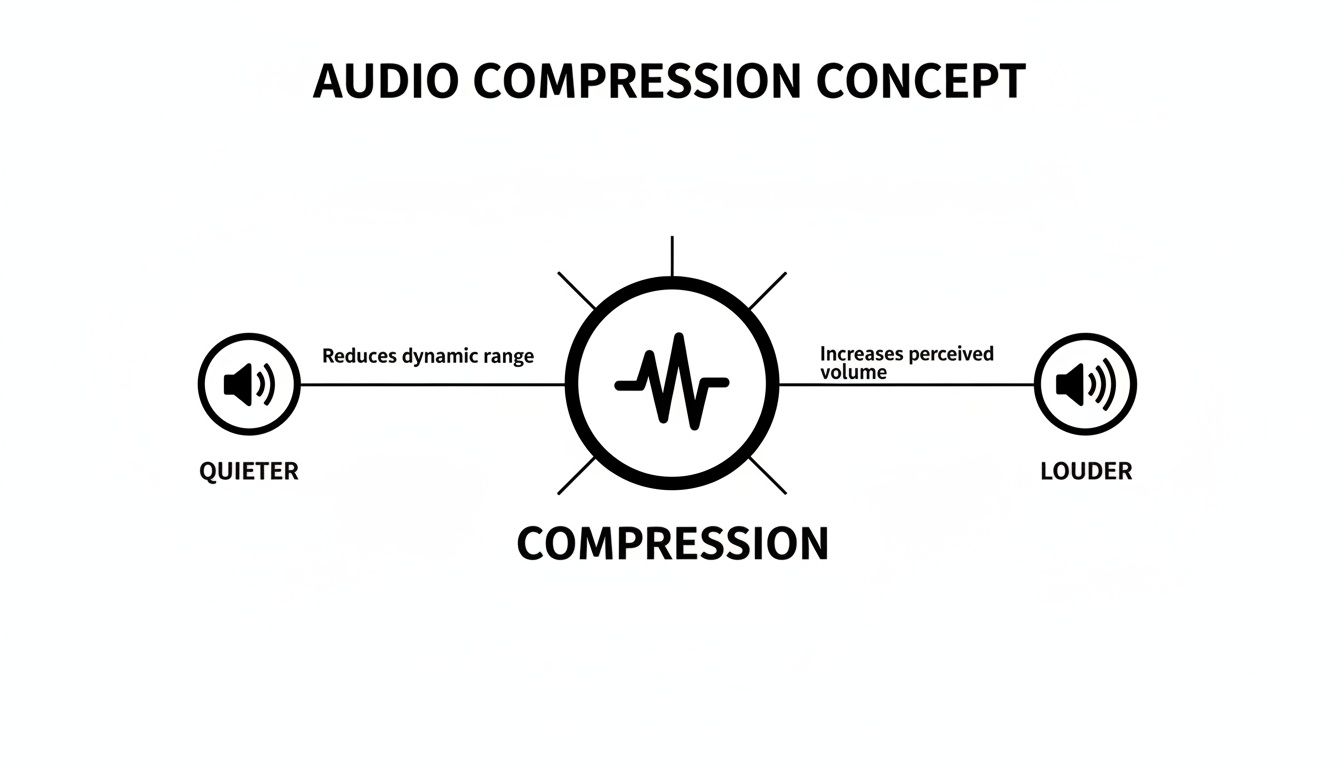
As the diagram shows, a compressor squashes the loud peaks down. This gives you the headroom to turn the entire signal up, making the once-hidden quiet parts much more audible and creating a fuller sound.
The Threshold is the volume level (measured in decibels, or dB) that a sound has to hit before the compressor even wakes up. It’s essentially a tripwire for your audio.
Imagine a bouncer at a club door who’s been told to quiet down anyone getting too rowdy. The Threshold is the "loudness level" that gets the bouncer's attention. Any sound that stays below this level is left alone, but the moment a signal crosses it, the compressor kicks in.
A low threshold means the compressor will be working on most of your signal. A high threshold, on the other hand, means it will only step in to tame the absolute loudest peaks.
Once a sound crosses the threshold, the Ratio tells the compressor how much to turn it down. It’s the control for the intensity of the compression.
A 4:1 ratio is a great place to start. What this means is for every 4 dB the audio signal goes over the threshold, the compressor only lets the output increase by 1 dB. A gentler 2:1 ratio will give you very subtle control, while a heavy-handed 10:1 ratio acts more like a limiter, aggressively slamming the brakes on any loud peaks.
Timing is everything in compression, and that’s where the Attack and Release controls come into play. These two knobs dictate how the compressor reacts over time.
Attack: This is how quickly the compressor starts turning down the volume once the signal crosses the threshold. A fast attack is great for instantly taming sharp sounds. A slow attack, however, lets the initial "punch"—the transient—of a sound (like the crack of a snare drum) pop through before the compression grabs hold.
Release: This setting determines how long the compressor takes to let go after the signal has dropped back below the threshold. A short release can sound exciting and energetic but can sometimes create an unnatural "pumping" sound. A longer release will almost always sound smoother and more transparent.
Nailing these two settings is the real art of compression, shaping the groove and character of your sound. Of course, compression is often used alongside EQ. To learn more about how they work together, it's worth understanding what parametric EQ is and how it works.
Here’s the thing about compression: because it’s designed to turn down the loudest parts of your audio, the overall track will naturally sound quieter. That's where Makeup Gain (sometimes just called Output) saves the day.
Makeup Gain is used to boost the volume of the entire compressed signal back up. This is the magic step that brings all the quiet details forward, making your track sound fuller, punchier, and more present.
By balancing these five controls, you can start to add that professional polish, control unruly dynamics, and bring your audio to life.
So you’ve got a handle on the basic controls. Now we get to the fun part: picking your compressor.
Think of different compressors as a set of paintbrushes. They all do the same fundamental job, but each one has its own texture, feel, and character. One might be perfect for broad, smooth strokes, while another is better for sharp, aggressive detail. The same is true in audio—choosing a compressor isn't just a technical move, it's a creative one. Some are clean and surgical, while others are famous for the warm, gritty color they add.
First up, the workhorse of the studio: the VCA (Voltage Controlled Amplifier) compressor. These are known for being clean, fast, and incredibly precise. When you need to clamp down on dynamics without smearing the sound or adding a ton of vintage vibe, a VCA is your go-to.
Their snappy, predictable nature makes them perfect for taming sharp, pokey sounds. Need to add punch to a snare drum or lock a rhythmic synth bass into the groove? Grab a VCA. It does its job and gets out of the way.
On the complete opposite end of the spectrum, we have Optical (or Opto) compressors. These are the smooth operators. They work using a light-dependent resistor, which gives them a wonderfully gentle and musical response. Their attack and release are naturally slower and less grabby than other types.
This buttery character makes them a favorite for vocals, bass, and acoustic guitars. An optical compressor can effortlessly level out a performance without it ever feeling squashed or robotic. It’s like a steady, guiding hand on the volume fader, preserving all the emotion in the sound.
For many engineers, optical compressors are the secret sauce for making vocals sit perfectly in a mix. Their slow, program-dependent release just feels right to the human ear, adding a beautiful warmth and presence.
Looking for attitude? Meet the FET (Field Effect Transistor) compressor. These things are known for being lightning-fast, aggressive, and absolutely dripping with character. They were designed to emulate old tube circuits, and they’re famous for the punch, excitement, and even gnarly distortion you can get when you push them hard. Transparent is not in their vocabulary.
This makes them fantastic for injecting pure energy into drums, making a lead vocal snarl with attitude, or giving a bass guitar some serious bite. If you need a sound to leap out of the speakers and grab the listener, a FET compressor is an amazing choice.
This journey from physical hardware to versatile software plugins mirrors the evolution of audio itself. When the MP3 format launched in 1991, it changed the game for beginners by making digital music portable through lossy compression. By 2001, its successor, Advanced Audio Coding (AAC), offered even better quality with 30% smaller files at the same bitrate. It’s this efficiency that allows tools like SFX Engine to output AI-generated sounds in AAC, ready to drop straight into any project. You can learn more about how audio formats have evolved over time on Wikipedia.
Theory is great, but the real learning happens when you start twisting knobs. I know that diving into compression for the first time can feel a little intimidating, so let's walk through some clear, actionable starting points for the most common things you'll be working with.
Think of these less as rigid rules and more as proven recipes to get you in the right ballpark. From there, your ears can take over. We'll look at how to give vocals that smooth, upfront presence, how to make a kick drum punch, and how to give a snare some serious snap.
Vocals are naturally all over the place dynamically. A singer might whisper one line and belt the next. Our job with compression is to gently even out those swings so every word is heard, but without squeezing the life and emotion out of the performance. This is crucial whether you're mixing a song or figuring out how to do a voice over like a pro.
Dial in these settings and then adjust your threshold until you see the gain reduction meter knocking back about 3-6 dB on the loudest parts.
The real secret to great vocal compression is transparency. Your listener shouldn't hear the compressor working; they should just feel that the vocal sits perfectly in the mix, always present and easy to follow.
With drums, we shift our focus from just controlling dynamics to actively shaping the sound. It's all about impact. Here, the attack and release controls are your best friends for sculpting the punch and character of each hit.
Let's break down how to get a kick drum that hits you in the chest and a snare that cracks right through the mix.
For a Punchy Kick Drum:
For a Snappy Snare Drum:
Understanding these principles is a huge step forward, especially for podcasters aiming to improve their production quality. For a deeper dive into overall audio polish, you might find our guide on how to edit podcast audio helpful.
Sound effects, particularly AI-generated ones from tools like SFX Engine, can have a massive dynamic range. Think about a "rolling thunder" effect—it might start with a low rumble and build to a deafening crash. Compression is the tool we use to make these sounds sit just right in a scene without overpowering everything.
For a sound like 'crashing waves' that needs to be background ambience, you want consistency. Try a low ratio (2:1), a fast attack (1 ms), and a slow release (200-300 ms). This will gently tame the peaks of each wave crash, creating a smooth and steady sonic bed.
On the other hand, for an explosive sound effect that needs to maintain its impact, you'd use settings much closer to our kick drum recipe—letting that initial transient pop through before controlling the tail.
These are just starting points, of course. The most important thing is to use these settings to get in the ballpark and then fine-tune everything by ear to fit the specific needs of your track.
| Audio Source | Threshold | Ratio | Attack | Release |
|---|---|---|---|---|
| Vocals | -10 to -20 dB (aim for 3-6 dB GR) | 2:1 to 4:1 | 5-10 ms (Medium) | 50-100 ms (Medium) |
| Kick Drum | -10 to -15 dB (aim for 4-8 dB GR) | 4:1 | 20-30 ms (Slow) | 50 ms (Fast) |
| Snare Drum | -10 to -15 dB (aim for 4-8 dB GR) | 4:1 to 6:1 | 10-20 ms (Slow) | 50-80 ms (Fast) |
| Sound Effects | Varies widely (adjust to context) | 2:1 to 6:1 | 1-30 ms | 50-300 ms |
Don't be afraid to experiment! Breaking these "rules" is often how you discover new and interesting sounds. Happy compressing
The meters and graphs on your compressor are great for getting a visual read on what’s happening, but they don't tell the whole story. At the end of the day, the only thing that matters is how it sounds. Learning to listen with a critical ear is probably the single most important skill you can develop, especially when you're just starting out with audio compression for beginners.
Your goal is to make changes that feel right, not just look right on a plugin. The bypass button is your best friend here. Get in the habit of constantly toggling it on and off to compare the compressed sound with the original. This simple A/B test is the only way to know for sure if you’re actually making an improvement, or just making things different.
As you get more familiar with compression, you’ll start to pick up on the classic signs of a poorly set compressor. When you're new to this, it helps to be a bit heavy-handed at first. Deliberately dial in some extreme settings to make the artifacts obvious, then you can back them off until they sound natural and musical.
Here are a few common red flags to keep an ear out for:
The best compression is often the compression you don't notice. The listener shouldn't consciously hear the compressor working; they should just feel that every element in the mix is clear, present, and perfectly balanced.
Steering clear of a few classic pitfalls will seriously speed up your learning curve and make your mixes sound better, faster. One of the biggest mistakes is trying to use compression to fix a bad recording. If your source audio has problems like distracting background noise or a shaky performance, a compressor is only going to make those issues louder and more obvious. For more on this, check out our guide to building a solid audio post production workflow to get things right from the start.
It's also helpful to remember where this all came from. The concept of compression isn’t new; it dates all the way back to 1925 when Bell Labs used it to clean up tones for radio transmission. We've come a long way since then, from the first digital signal processors in 1979 to modern tools that help us integrate sound effects without bloating our projects. You can read more about the fascinating history of sound recording on Artloftmedia.com. The lesson from all that history is the same: subtle, purposeful adjustments almost always beat heavy-handed processing.
Once you get a feel for the main controls, you’ll start asking more specific questions. That’s a good thing! It means you’re thinking critically about how to use these tools to solve real-world audio problems.
Let's dig into a few of the most common questions that come up when people are starting out.
It's helpful to think of a limiter as a compressor's much more aggressive older brother. While a compressor is all about shaping and controlling dynamics, a limiter’s job is to be a brick wall. Its sole purpose is to stop any audio from getting past a certain volume level, period.
The main difference is in the settings. A limiter is technically just a compressor with a super high ratio—we're talking 10:1 at a minimum, but often pushed all the way to infinity (∞:1). Compressors shape sound; limiters are for protection, often used as the very last plugin on your master bus to prevent digital clipping.
Definitely not. This is probably the single most common mistake beginners make. Compressing everything just for the sake of it will suck the life right out of your mix, leaving it feeling flat and lifeless.
Always have a reason to compress. Before you even open the plugin, ask yourself: “What problem am I actually trying to solve here?” If a track already sounds great and sits perfectly in the mix, leave it alone!
For instance, a smooth synth pad that holds a steady volume probably doesn't need compression. On the other hand, a dynamic vocal performance with loud and quiet parts is a perfect candidate.
Parallel compression is a fantastic technique for adding power and weight to a sound without squashing its natural dynamics. It's sometimes called "New York compression," and the concept is simple: you blend a heavily compressed version of your track right alongside the original, uncompressed signal.
This approach gives you the best of both worlds:
By mixing these two signals together, you can make drums hit harder and vocals sound massive without losing their original energy. You get all the aggressive character of heavy compression while letting the track breathe.
Ready to create the perfect sound effects for your projects? SFX Engine uses AI to generate unique, royalty-free audio from simple text prompts. Whether you need a subtle ambient texture or a powerful impact, get the exact sound you hear in your head. Explore unlimited creative possibilities by visiting SFX Engine.