November 27, 2025 · Kuba Rogut
High-quality bird sound effects do more than just fill the silence; they build worlds. Whether you're designing for film, a podcast, or a video game, moving beyond generic chirps to create specific moods and settings is what separates good sound design from great. This guide is all about crafting that rich, believable avian audio—using a mix of AI tools, smart layering, and environmental processing to build a dynamic soundscape from the ground up.
Building a convincing atmosphere takes more than just dragging a generic "chirping" track into your project. The right bird sound can ground a scene in reality, signal a shift in emotion, and give the audience crucial narrative cues without a single word of dialogue.
Think about a tense thriller set deep in a forest. What's more unsettling than the sudden, complete silence of all bird calls? It signals impending danger far more effectively than a dramatic musical score ever could. On the flip side, the lively dawn chorus of robins and sparrows can instantly paint a picture of peace and new beginnings in a heartwarming scene. That’s the power of deliberate, thoughtful audio design.
Every bird call has a purpose and a context. A distant hawk's cry immediately suggests a vast, open landscape, while the frantic, clustered chirps of sparrows might tell us a predator is nearby. By carefully choosing and placing specific bird sounds, you’re actively directing the scene.
You can:
Sound design isn't just background noise; it's an invisible layer of storytelling. The difference between a flat, generic scene and a living, breathing world often comes down to the authenticity and detail of its ambient sounds.
Bird vocalization is an incredibly complex field. With over 10,000 species around the globe, the variety is staggering. Birds are also masters of adaptation; urban birds, for instance, often sing louder and at a higher pitch just to cut through the constant low-frequency rumble of traffic.
In fact, during the COVID-19 pandemic lockdowns, birds in San Francisco were recorded singing 30% more softly once that urban noise pollution dropped off. This just shows how responsive they are to their acoustic environment.
This natural complexity is exactly what we're trying to replicate. Once you start to understand these nuances, you can build a soundscape that feels truly alive and authentic. If you want to get a feel for some high-quality recordings, a great place to start is by exploring our collection of free audio nature sounds.
This is where the real fun begins. Instead of trawling through endless sound libraries for the "perfect" chirp, a text-to-sound effects engine lets you create it from scratch. The core of this process is getting good at writing prompts—the text instructions that tell the AI what kind of bird sounds effects to generate.
Think of yourself as a director giving notes to an actor. Vague instructions get vague results. The more detailed and evocative you are, the more lifelike the final sound will be. It's your chance to go beyond a generic "bird chirping" and craft something with real character and context.
From my experience, the best prompts for bird calls blend three key things: the species, the action, and the environment. Nailing this combo is how you get a huge variety of sounds from just one core idea. You'll find that even small tweaks in your wording can lead to some surprisingly different audio.
Here’s a breakdown of what I focus on:
A prompt like "A lone mourning dove cooing softly in a quiet suburban backyard in the morning" gives the AI a complete picture. That level of detail gets you a sound effect that's already 90% of the way there, saving you a ton of mixing time later.
Pro Tip: Don't be afraid to use emotional language. I've found that adding words like 'melancholy,' 'agitated,' or 'joyful' can really influence the tone and performance of the bird song. It's a great way to add a bit of narrative depth.
To really illustrate how you can craft prompts for different needs, here are some examples showing how you can go from simple to incredibly specific.
| Desired Outcome | Example Prompt | Key Elements & Rationale |
|---|---|---|
| Simple, isolated chirp | sparrow chirping | Minimalist. Good for a quick, non-specific sound effect, but lacks character or context. A basic starting point. |
| More descriptive song | A single house sparrow singing a short, cheerful melody on a sunny morning. | Adds context. We've now specified the species, the emotion ("cheerful"), and a simple environmental cue ("sunny morning"). Much more evocative. |
| Complex ambient layer | Close-up recording of a small flock of house sparrows chattering and chirping excitedly in a dense hedge, with subtle wing flutters, clean audio. | Builds a scene. This asks for multiple birds, mixed actions ("chattering," "chirping"), a location that affects the sound ("dense hedge"), and even technical notes. |
| Distant, moody call | A lone raven cawing, distant and echoing across a misty, cold valley. | Sets a mood. The focus here is on distance, reverb ("echoing"), and atmosphere ("misty, cold"). Perfect for establishing a specific tone. |
These examples show how a little extra detail can transform a generic sound into a custom-designed piece of audio that fits your project perfectly.
The broader world of AI integration in post-production is full of these small workflow enhancements that, when combined, can make a huge difference.
Beyond the prompt itself, you'll have a couple of key technical settings to dial in. The two you’ll use most are duration and fidelity. Getting these right from the start saves a lot of headaches down the road.
Starting with the best possible raw ingredients makes all the downstream processing and layering so much easier and more effective. If you're interested in the wider principles of sound creation, our general guide on how to create sounds is a great place to start. Getting these foundational calls right is the most important part of building a rich, believable soundscape.
Getting a single, clean bird sound is one thing, but that's rarely how we experience nature. A truly believable environment isn't about one isolated call in a sea of silence—that just sounds fake. It's about weaving together a rich tapestry of sound to create depth, realism, and a genuine sense of life.
The real artistry comes from layering different sounds to build a complete scene. Think of it like painting. You start with a background wash, add your main subject, and then sprinkle in smaller details to bring it all together. For us, that means combining a prominent "hero" call with more distant, secondary calls and a subtle bed of ambient chatter.
To build a convincing soundscape, I almost always work with three distinct layers. Each one has a specific job, and when they work in concert, they create a sense of space and activity that a single sound effect never could.
This workflow visualizes how these separate elements—the main call, the background ambiance, and the techniques used to create space—all merge into a cohesive final product.
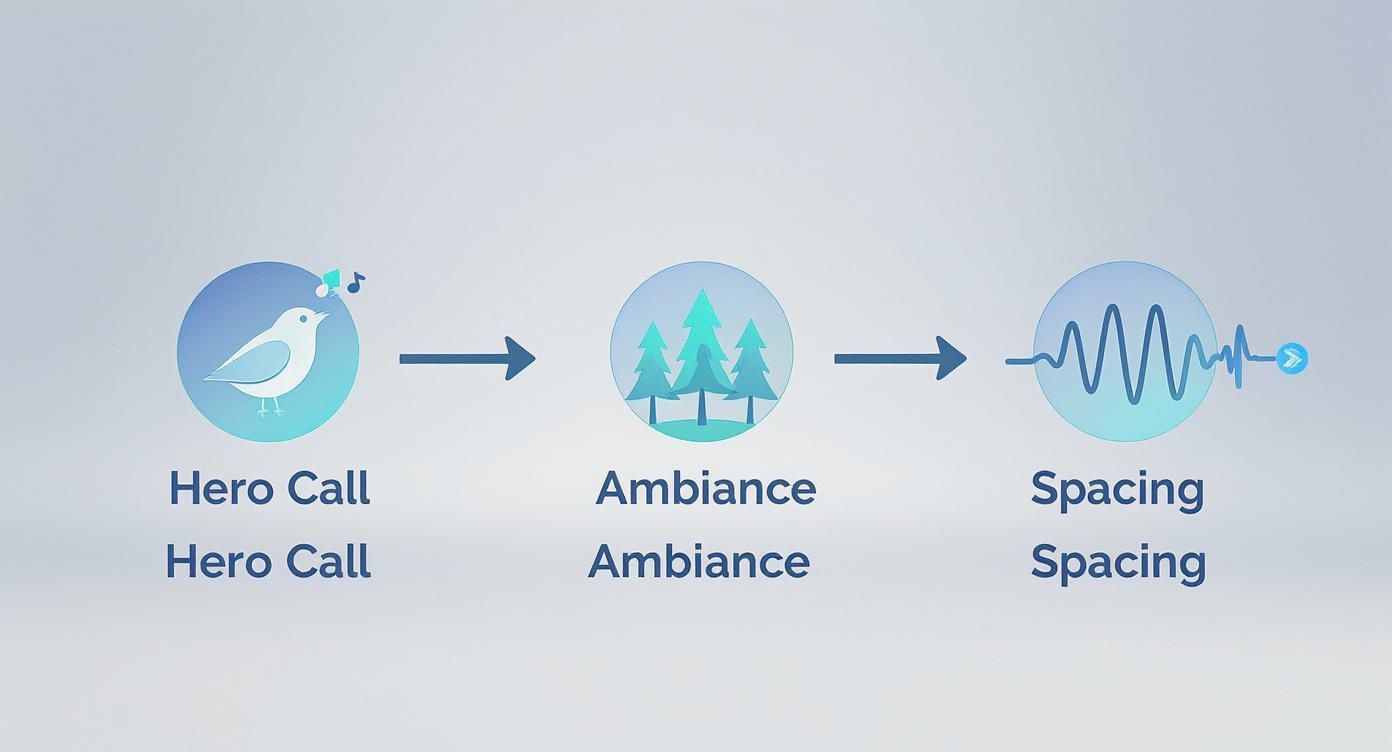
As you can see, it’s not just about piling sounds on top of each other. The magic is in the processing that creates that sense of place.
When you start layering multiple bird calls, you can quickly end up with a muddy, cluttered mess where nothing really stands out. This is a common problem, as many bird songs occupy similar frequency ranges. The fix is to use a few key audio tools to give each sound its own sonic pocket to live in.
Equalization (EQ) is your best friend here. The goal is to gently carve out specific frequencies from one sound to make room for another.
For instance, your hero bird call might be rich in the 2-5 kHz range, which is where human hearing is particularly sensitive. To make sure it cuts through the mix, you can apply a slight EQ dip in that same frequency range on your secondary calls and ambient chatter tracks. This tiny adjustment helps the hero call pop without having to crank up its volume.
The best mixes aren't about making one thing louder; they're about making other things quieter in just the right places. It's a subtractive process that creates clarity and depth.
Compression is another essential tool, but you have to use it with a light touch. A gentle compressor with a slow attack and a low ratio (think around 2:1) can help tame the sharp, transient peaks of a bird's chirp. This helps control the dynamics, making the sound sit more comfortably in the overall mix and preventing any sudden, jarring peaks from yanking the listener out of the experience.
Once your layers are balanced against each other, reverb is the acoustic glue that makes it all sound like it's happening in the same place. It’s what tells the listener if these birds are in a dense forest, an open field, or a rocky canyon.
The type of reverb you choose is a critical part of the storytelling.
Crucially, don't just slap the same reverb setting on every track. Your hero call should be the "driest" (least reverb) to make it feel closest. Your secondary calls get a bit more, and the ambient chatter layer can be the "wettest," pushing it far into the background.
A static soundscape feels dead. In reality, birds are always moving—flitting from branch to branch, or soaring across the sky. You can bring this dynamism to your project by automating volume and panning in your audio editor.
Picture a bird flying from left to right. To create this effect, you would simply draw an automation curve that gradually moves the pan from the left speaker to the right. At the same time, you can draw a volume curve that swells as the bird gets "closer" (the center of the pan) and then fades as it moves away.
These small, automated movements are the finishing touch. They transform a static recording into a living, breathing scene, making your sound design feel truly immersive. By layering, processing, and automating, you’re not just playing back sounds—you’re building a world.
Creating beautiful bird sounds effects is one thing, but the real magic happens when you convince the audience that the sound belongs to the world on screen. This is where technical skill elevates artistry, making every chirp and flutter feel physically grounded in the scene.
A bird that looks far away must sound far away. One flying past the camera has to move through the acoustic space in a way that feels right. Getting this right is about more than just nudging a volume fader—it's about mimicking how sound behaves in the real world.
Placing a bird at a specific distance is probably the most common task you'll face. Just turning the volume down is a start, but it won't fool anyone's ears for long. As sound travels through air, it loses its high-frequency energy first.
This means a distant bird call sounds both quieter and duller. To nail this effect, you'll need to use a few tools in combination:
Interestingly, a recent global study of over 140,000 recordings revealed just how much bird call frequencies vary by habitat. Birds in noisy environments, like near rushing water, often evolve higher-pitched calls to cut through the low-frequency rumble. This kind of real-world data helps you make smarter EQ decisions.
What about a bird that isn't sitting still? For that classic shot of a bird flying past the camera, you need to recreate the Doppler effect. It's the same reason an ambulance siren sounds higher as it approaches and lower as it drives away.
You can fake this convincingly with some simple automation:
The secret to a believable Doppler shift isn't a huge pitch change. It’s the timing and speed of that pitch drop right at the moment of the pass-by. That split-second transition is what our brains instantly recognize as motion.
Let's put this into practice. Knowing a little about visual composition can actually make you a better sound designer. The principles behind framing a subject, for instance, are surprisingly similar to how we place a sound in a mix. Checking out some wildlife photography tips can give you a fresh perspective on creating focus and depth.
Here’s how you might tackle a couple of common scenarios.
Scenario 1: A Robin Singing Outside a Window
The bird is close, but there’s a pane of glass in the way.
Scenario 2: A Flock of Geese Flying High Overhead
The geese are distant and moving across the vast sky.
Mastering these techniques is what separates good sound design from great sound design. To get deeper into the nuts and bolts, our guide on how to sync audio with video is a great next step.
https://www.youtube.com/embed/ctd--CspA5g
You’ve done the creative heavy lifting—generating, layering, and tweaking your sounds until they're perfect. Now you have a folder full of custom bird sound effects. But before you can use them, there are a couple of crucial final steps. This is all about turning those audio clips into professional, project-ready assets and making sure you’re covered legally.
Getting your files exported and organized correctly isn't just a bit of housekeeping. It's the difference between a messy folder of clips and a searchable, usable sound library. On that same note, understanding the licensing is non-negotiable, especially if you plan to use these sounds in anything you share or sell.
The format you choose for your final files will have a big impact on how they sound and perform in your projects. The decision really boils down to the classic audio debate: lossless quality versus compressed convenience.
WAV (Waveform Audio File Format): This is the industry standard for a reason. WAV files are completely uncompressed, which means they keep 100% of the original audio data. For any serious sound design in film, games, or music where you can't compromise on quality, you should always be working with WAVs.
MP3 (MPEG Audio Layer III): MP3s are great for saving space, but they achieve that small file size by throwing away some of the audio data. That’s fine for listening to music on your phone, but it’s a bad move for production assets. You lose fidelity, and the file will start to fall apart if you try to do any further processing like time-stretching or pitch-shifting.
For any real project work, the choice is easy. You’ll want to export your master sound effects as 24-bit, 48 kHz WAV files. This format gives you excellent dynamic range and is the go-to standard for most video and game audio pipelines. You can always create an MP3 copy later if you need one, but you can’t get back the quality you lose by exporting as an MP3 first.
Think of it like a photographer shooting in RAW versus JPEG. A WAV file is your RAW image—it has all the original data, giving you total flexibility. An MP3 is the JPEG; it’s smaller and easy to share, but a lot of the detail has already been stripped away.
As your sound library grows, a folder full of files like "BirdChirp_Final_02.wav" will become a nightmare to navigate. This is where a consistent and descriptive naming convention becomes your best friend. I've found a simple structure works wonders:
Category_Species_Action_Descriptor.wav
Using this system, your file names instantly tell a story:
Bird_Robin_Singing_Morning.wavBird_Hawk_Screech_DistantEcho.wavBird_Sparrow_Flock_Chatter.wavThis makes your files searchable and easy to understand at a glance. To take it a step further, you can embed metadata directly into the files. Most audio editors let you add tags for the creator, a description, and keywords, making it a breeze to manage a huge library with professional asset management software.
This might be the most critical step of all. Because you’ve used an AI tool like SFX Engine to create the base sounds, you need to be crystal clear on what your rights are. Luckily, the licensing is designed to be very straightforward for creators.
When you generate a sound on a platform like ours, it generally comes with a commercial, royalty-free license. Let’s break down exactly what that means for you.
| License Type | Key Feature | Best For |
|---|---|---|
| Royalty-Free | You pay once (or use credits), then you can use the sound in unlimited commercial projects forever without paying any more fees. | Nearly all commercial work: films, games, podcasts, YouTube videos, and social media content. |
| Creative Commons (CC) | A family of different licenses. Some allow commercial use, some don't, and they often require you to credit the creator. | Personal projects or situations where you can easily provide attribution as required by the specific CC license. |
The main thing to remember is that sounds generated with a royalty-free license give you the freedom and peace of mind to use your custom bird sounds in any monetized project. There are no surprise fees, no attribution requirements, and no legal headaches down the road. For any serious creative or commercial work, it's the only way to go.
Even with amazing tools at our disposal, we all hit creative walls and technical snags when designing custom audio. Let's walk through some of the most common questions that pop up when crafting bird sound effects, with practical solutions I've found work best.
This happens to everyone, and the culprit is almost always the prompt. If your bird calls are starting to sound like a broken record, it’s probably because your text instructions are too vague. Giving an AI a simple prompt like "bird chirping" is like asking an artist to "paint a picture"—it's going to default to the most generic thing it knows.
To break out of that rut, you have to feed it more detail. Think like a director. Instead of a generic prompt, try something with character: "a single European robin singing a complex, melodic song in an open field at dawn." See how much more information that gives the AI to work with?
A couple of other tricks I use:
This is all about knowing your birds and understanding density. The avian world runs on a pretty tight schedule, and matching your soundscape to that schedule is what sells the realism. A dawn chorus, for instance, sounds completely different from the sparse calls you'd hear on a hot afternoon.
For that classic "dawn chorus," your goal is a rich, energetic wall of sound. You'll want to layer lots of different songbirds—think robins, blackbirds, sparrows, and finches—all singing their hearts out at once.
Midday scenes, on the other hand, are all about subtlety. The activity dies down in the heat. Here, you'd use more sporadic, individual calls. Think of the coo of a distant pigeon or the call of a lone crow. For evening and night, the cast changes completely to owls or nightjars, which immediately shifts the entire mood.
The biggest mistake I see is people grabbing a single, pre-made "flock of birds" sound effect. They almost always sound flat and fake because they lack the beautiful, chaotic detail of individual birds acting as a group. The secret is to build the flock yourself, one bird at a time.
Here's a simple workflow that delivers fantastic results:
This hands-on, layered approach creates a far more dynamic and believable sound than any single effect ever could. You get a true sense of a group made up of individuals, which is exactly what a real flock is.
Ready to stop searching through generic libraries and start creating your own custom audio? SFX Engine lets you generate endless, royalty-free bird sound effects just by typing. Start creating for free today!