December 11, 2025 · Kuba Rogut
Convolution reverb is a fascinating process that lets you digitally capture the unique acoustic personality of a real-world space and apply it to any sound you want. Instead of relying on algorithms to fake a room's sound, it uses a special audio recording—a sort of sonic photograph—called an Impulse Response (IR). This allows you to place a vocal in a grand cathedral, a snare drum in a tiled bathroom, or a synth lead inside a tiny cardboard box with jaw-dropping realism.
Imagine you could somehow record the echo of a handclap in the Grand Canyon or the way a guitar chord rings out in Abbey Road Studios. That’s essentially what convolution reverb does. It moves past the often-synthetic sound of older digital effects to give you a genuine sonic clone of a real place, a level of authenticity that was once unthinkable in a home studio.
The magic happens through a mathematical process called "convolution." A convolution reverb plugin takes your dry, unprocessed audio and digitally blends it with that pre-recorded Impulse Response. When it's done, your sound inherits the exact acoustic traits of the space where the IR was recorded.
Convolution reverb stands apart from its cousin, algorithmic reverb, which uses mathematical formulas to simulate how sound might bounce around in a fictional space. Because it's based on actual recordings, convolution reverb offers a completely different feel and a distinct set of strengths.
To get a clearer picture, let's break down how these two reverb types stack up.
This table offers a quick comparison of the two main types of digital reverb, highlighting where each one shines.
| Feature | Convolution Reverb | Algorithmic Reverb |
|---|---|---|
| Sound Source | Based on a real-world recording (Impulse Response) | Generated by mathematical algorithms |
| Realism | Extremely high; an authentic sonic snapshot | Can be realistic, but is ultimately a simulation |
| Flexibility | Less flexible; core acoustics are fixed | Highly flexible; can easily adjust room size, shape, etc. |
| CPU Usage | Can be very high, especially with long IRs | Generally lower and more efficient |
| Best For | Recreating specific, real environments; realistic spaces | Creating stylized, larger-than-life, or adjustable spaces |
| Creative Use | Excellent for sound design using unusual IRs | Great for classic reverb effects and designing unique spaces from scratch |
Ultimately, neither is "better"—they are just different tools for different jobs. Many producers use both, reaching for convolution when authenticity is key and algorithmic when they need more creative control over the space itself.
The Impulse Response, or IR, is the absolute heart of convolution reverb. Think of it as the acoustic DNA of a space. It’s captured by recording a short, sharp, and full-frequency sound—like a starter pistol, a balloon pop, or a controlled sine wave sweep—in a specific environment.
An artist might capture an IR of their abandoned family home to embed memories and sonic archives into a new piece of work. By popping a balloon and recording the resonance, they capture the unique sonic signature of each room, which can then be applied to musical notes or other sounds.
That single recording contains all the crucial information about how sound behaves there: every echo, every reflection bouncing off every surface, and the overall tonal character of the room.
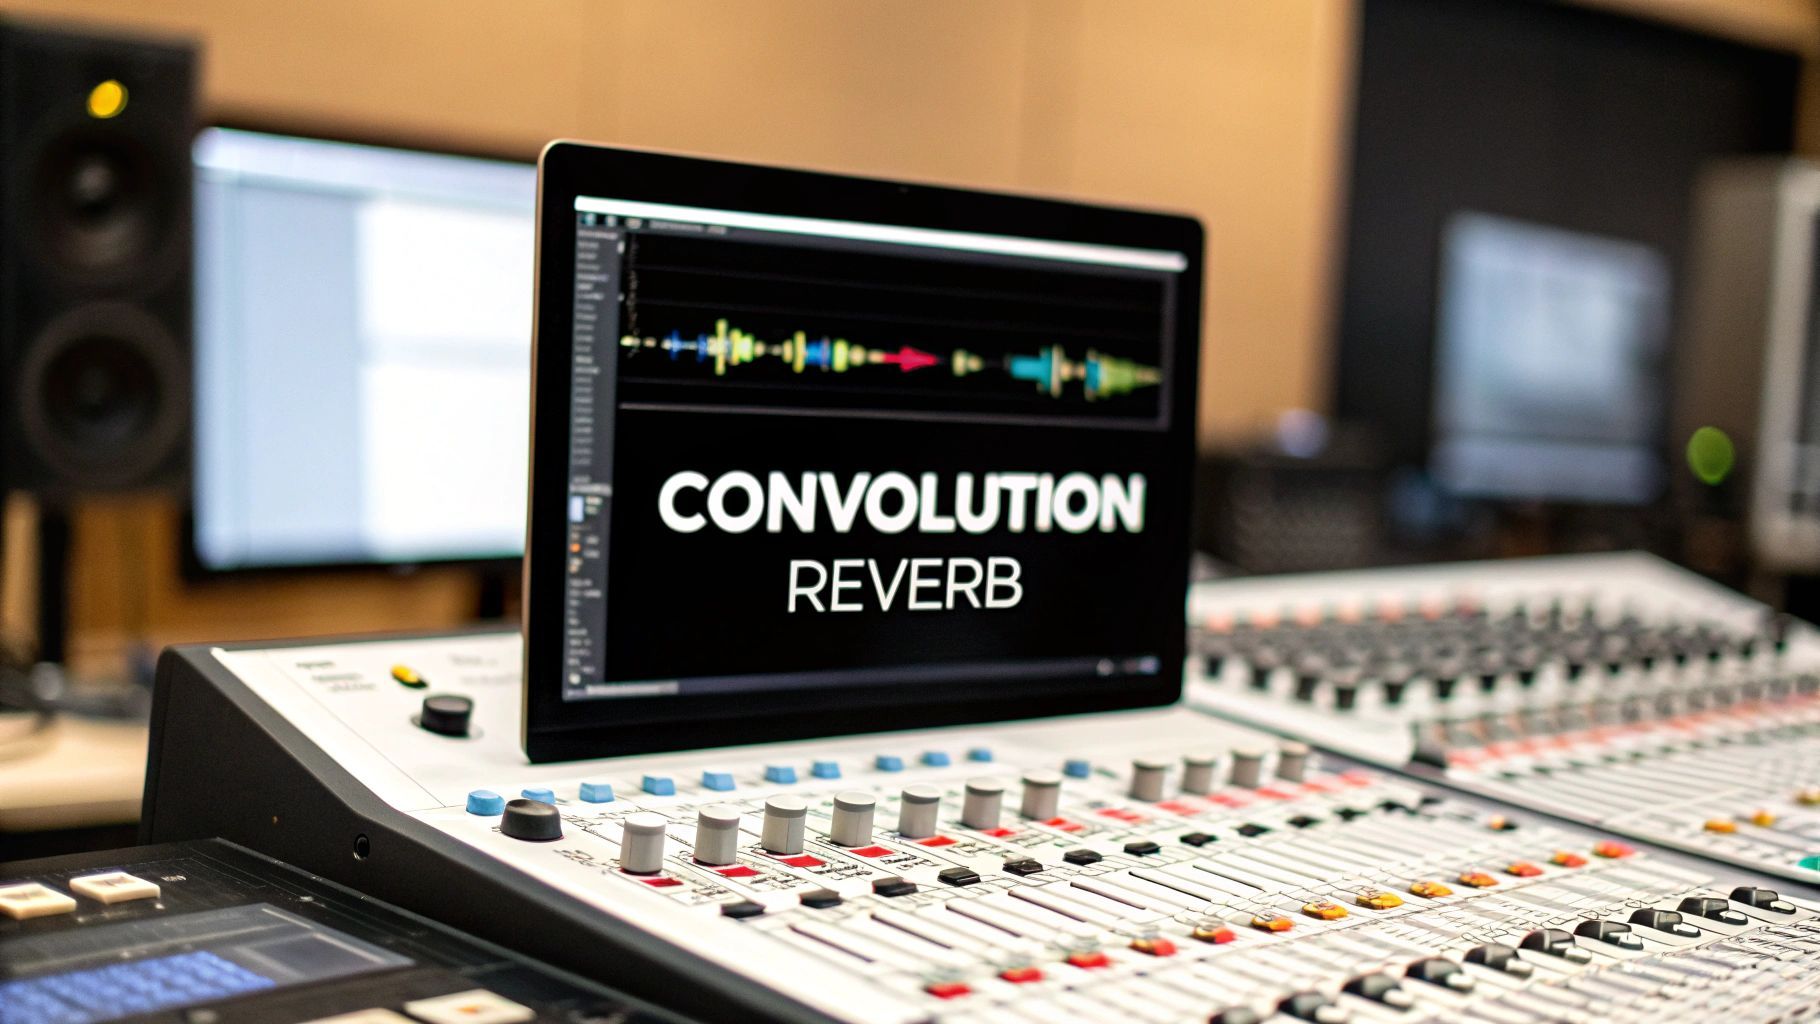
Here’s a look at FL Studio's Fruity Convolver, a popular convolution reverb plugin, showing what a loaded Impulse Response looks like.
The waveform you see on the screen is the IR file—the acoustic fingerprint that’s about to be stamped onto your audio. It’s a direct visual link between the real-world space and the sound you're about to create.
To really get what convolution reverb is all about, you have to start with its secret ingredient: the Impulse Response (IR). An IR isn't just a regular sound file. Think of it as the captured acoustic DNA of a specific room, piece of gear, or even a weird object. It’s a sonic fingerprint that holds every last detail of how that thing reacts to sound.
Imagine standing in a massive, stone cathedral and popping a balloon. That sound—the ridiculously complex and beautiful echo that swirls around before fading to silence—is exactly what an IR captures. It records the initial pop, the thousands of reflections bouncing off pillars and vaulted ceilings (early reflections), and that long, smooth tail as the sound’s energy finally dies out.
This is the magic at the heart of the process: your dry sound gets processed using the acoustic data from a real space to create a reverb effect that feels truly authentic.
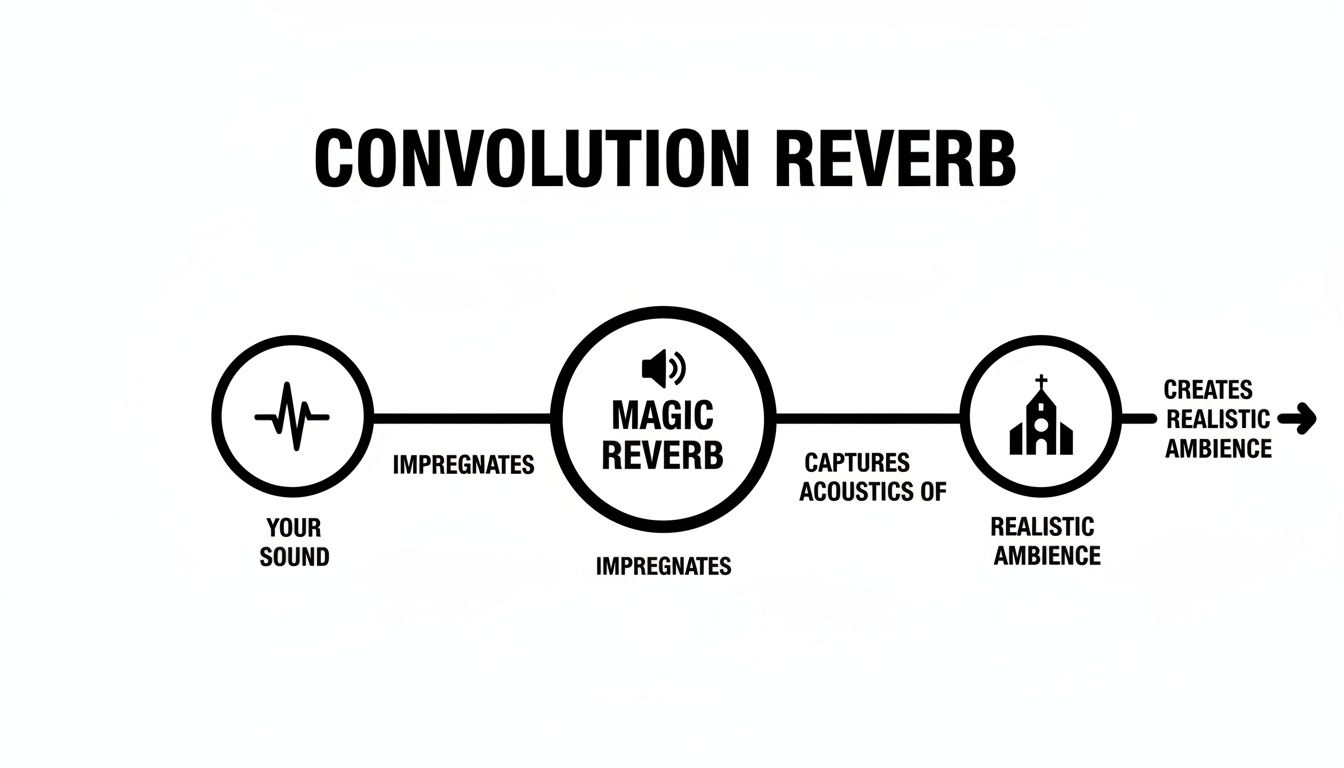
As you can see, convolution reverb acts as a bridge, essentially stamping the unique sonic signature of a real place onto whatever sound you run through it.
So how does a simple audio file make your home-recorded vocal sound like it’s soaring through that cathedral? The secret is a mathematical process called convolution. Don't worry, you don't need a degree in advanced calculus to get the gist of it.
Think of it this way: your dry audio is a rubber stamp, and the Impulse Response is a really intricate, detailed ink pad. The convolution process is like pressing that stamp (your audio) onto the ink pad (the IR). The final impression carries all the rich texture and character of the ink. Every little nuance of the IR gets imprinted onto your original sound.
Behind the scenes, a convolution reverb plugin is doing millions of calculations a second to pull this off. It’s essentially multiplying every single sample of your track with every single sample of the IR file. What comes out the other end is a brand-new audio stream that sounds like it was actually recorded in that space.
This was a massive deal for music and audio production. When convolution reverb first hit the scene in the late 1990s, it offered a level of realism nobody had heard before from a plugin. Up to that point, we all relied on algorithmic reverbs, which were clever but were ultimately just a digital simulation of a space. Convolution, on the other hand, delivered the real thing.
Hardware units like Sony's DRE-S777, released in 1999, were the first to make this happen in real time, and they completely changed the game for professional studios. This shift suddenly allowed producers to bring the acoustic environments of the world's greatest venues right into their own projects.
An Impulse Response doesn't just capture the sound of a space; it captures the feeling. It contains all the subtle imperfections, weird frequency buildups, and unique flutter echoes that make a real room sound alive and believable. That’s the key to its incredible realism.
An IR isn't just any old recording. It’s a very specific kind of audio file, created in a very specific way to accurately capture a space's full frequency range and decay over time.
The Impulse: To "excite" the room, you need a sound that’s short, sharp, and contains a wide range of frequencies. This is often done with a starter pistol, a balloon pop, or a specially designed sine sweep that runs through all audible frequencies in a quick burst.
The Recording: High-quality, sensitive microphones are strategically placed around the room to capture both the impulse and the full reverb tail from different perspectives.
The File Format: The final recording is saved as a standard audio file, usually a WAV. This is the IR file you load into your convolution reverb plugin. To get a better handle on how these files work, you can learn more about the fundamentals of different audio file formats.
What this all means is that the quality of your convolution reverb is 100% dependent on the quality of the Impulse Response. A poorly recorded IR will give you a muddy, unconvincing reverb. But a meticulously captured IR from a world-class concert hall? That will give you breathtakingly realistic results every time.
Okay, this is where the fun really begins. We've talked theory, but now it's time to get hands-on. While there are thousands of incredible impulse responses out there, nothing—and I mean nothing—beats the magic of capturing your own.
This is how you build a truly personal library of acoustic fingerprints. Think about it: you can sample the tight, splashy sound of your bathroom, the cavernous boom of a local parking garage, or the beautiful, long decay of a nearby church. These aren't just reverbs; they're memories and unique textures that will make your productions stand out.

The basic idea is simple: you make a specific kind of sound in a space and record how that space reacts. That recording is the impulse response.
You don't need a mobile recording truck packed with vintage gear to do this. A few carefully chosen pieces of equipment will get you professional-level results. The main goal is to get the cleanest, most honest recording of the room's reaction possible.
Here's what you'll want to have in your bag:
Once you’ve got this kit together, you’re ready to go hunting for cool-sounding spaces.
Capturing a great IR is all about being methodical. A little patience and precision here will pay off big time.
Choose Your Location Wisely: The number one rule? It has to be quiet. Background noise is the enemy. Traffic, humming refrigerators, air conditioning—any of it can ruin your recording. I've found that recording in the very early morning hours is often the best strategy.
Strategic Microphone Placement: Put your mics where you want the "ears" of the listener to be. In a concert hall, that might be dead center, ten rows back. But don't be afraid to experiment! Try putting them in a corner or up in a balcony to capture different acoustic perspectives.
Position the Sound Source: Now, place your impulse source where the "performer" would be—on stage, in the middle of the room, etc. The distance between your source and your mics is a huge part of the sound, defining the balance between the direct clap and the wash of reverb that follows.
Record the Impulse: Watch your levels! The sudden crack of a starter pistol can easily clip your inputs, so give yourself plenty of headroom. Always record a few takes. Then, let the reverb tail fade out completely into total silence before you hit stop.
The most important part of this process is to listen back carefully right then and there. Your mission is to capture the pure, unadulterated sound of the room's decay. If you hear a distant siren or a floorboard creak in that tail, the take is toast. Do it again.
You've got the raw audio on your laptop—nice! Now it just needs a little bit of clean-up to become a polished, usable IR file.
First, pull the recording into your DAW and find the absolute best take. It should be the one with zero background noise and a nice, long, clean fade-out. Trim the very beginning of the file so it starts just a millisecond before the impulse hits. You want to keep that initial silence, as it contains the pre-delay information.
Next, you have to get rid of the impulse sound itself. If you used a sine sweep, most DAWs and dedicated tools (like Logic's Impulse Response Utility) have a "deconvolution" function that does this for you. If you used a balloon pop, you just trim the initial "pop" away, leaving only the beautiful reverb tail.
Finally, export the finished audio as a WAV or AIF file. That's it! You're ready to load your custom space into any convolution reverb plugin.
Of course, having a decent space to work in helps, even for editing. If you're just starting out, check out this guide on how to build a home recording studio for some great tips.
Knowing what convolution reverb is and knowing how to use it to create a professional mix are two completely different things. It’s easy to fall into the trap of just loading up a cool Impulse Response and cranking the mix knob, but that’s a fast track to a soupy, washed-out sound.
The real magic happens when you start thinking less about "adding reverb" and more about building a believable world for your sounds to live in. Your goal is to create the acoustic glue that makes a dozen separate tracks sound like they belong in the same room, recorded at the same time.
One of the most effective ways to make a mix feel cohesive is to put multiple instruments into the same virtual space. This is how you take a bunch of isolated, separately recorded parts and trick the listener's ear into hearing a unified performance.
Imagine you're mixing a string quartet. The violins, viola, and cello were probably all recorded one at a time in a dead-sounding booth. Send them all to the same convolution reverb loaded with a "Medium Concert Hall" IR, and they instantly come alive. They’re no longer just four separate recordings; they're an ensemble playing together, their sounds bouncing off the same virtual walls. It's a game-changer for everything from orchestral arrangements to acoustic folk.
Even though an IR is just a static snapshot, you still have plenty of control. Your convolution reverb plugin has a handful of critical parameters you need to master to make the effect work for your mix, not against it.
Pre-Delay: This is your secret weapon for clarity. Pre-delay is the tiny gap of silence between the dry sound and the start of the reverb. Adding even a short pre-delay (10-30ms) on a vocal or snare can create just enough separation to keep it from getting buried in the reverb tail. It pushes the sound forward, right in the listener's face, before the room's ambience kicks in.
Wet/Dry Mix: This is more than just a volume knob. It's about subtlety. When you want to place an instrument in a room rather than just slather it with reverb, try this: start with the mix at 0% and slowly bring it up until you can feel the space around the instrument without consciously hearing the effect.
Decay/Size: You can’t fundamentally change an IR, but you can almost always shorten its tail. That massive cathedral IR might sound amazing, but its ten-second decay time will turn your up-tempo pop track into mud. Most plugins let you trim the length, giving you the character of that huge space without the excessive tail.
These settings aren't a one-and-done deal. The perfect pre-delay for your lead vocal is almost never right for a background synth pad. Every sound in your mix deserves its own specific spatial treatment.
Just like a painter uses layers to create depth perception, you can use multiple reverbs to build a rich, three-dimensional soundstage. This is about moving beyond a single "room" and creating distinct foreground, mid-ground, and background layers.
Here's a simple framework you can try on your next project:
Foreground (Short & Subtle): For your lead vocal, snare, or any other up-front element, use a very short IR, like a "Small Wooden Room" or a plate. Keep the mix level very low. This just adds a little bit of life and character, keeping the sound present and close.
Mid-ground (The Main Space): This is the reverb that defines the primary environment for your track. Send your main instruments—guitars, keys, backing vocals—to a shared reverb bus with a medium-sized IR like a "Studio Live Room" or a "Small Hall."
Background (Large & Distant): For elements you want to push way back, like atmospheric pads or delay throws, use a large, long IR like a "Cathedral" or "Large Arena." Use it sparingly! A little goes a long way in creating a massive sense of scale.
By layering spaces like this, you create a mix that feels expansive and dynamic. You’re actively guiding the listener's focus, giving every element its own specific spot in the sound field instead of drowning everything in the same reverb.
Convolution reverb is rightly celebrated for its uncanny realism, but if you stop there, you're missing out on its greatest strength. Its true power is unleashed when you toss the rulebook out the window. The ability to capture the sonic fingerprint of anything lets you move far beyond cathedrals and concert halls. This is where convolution morphs from a mixing utility into a radical sound design weapon.
What happens when you use an impulse response that isn't from a room at all? The answer is pure sonic alchemy. You're no longer just creating reverb; you're imprinting the unique timbral and resonant DNA of one object onto a completely different sound. The result? Hybrids that are entirely new and unheard of.

This experimental mindset is where producers and sound designers truly innovate. It’s all about asking "what if?" and using the technology to explore sounds that simply can't exist in the real world.
The creative potential here is only limited by your imagination. Seriously. Anything that can resonate or make a sound when you hit it can become an impulse response, opening up a universe of textural possibilities that have nothing to do with traditional reverberation.
Just think about some of these unconventional IR sources:
By using unconventional IRs, you are essentially cross-pollinating sounds. You're blending the attack and pitch of your source audio with the decay and harmonic signature of a completely unrelated object, resulting in truly unique sonic textures.
This is the real magic of convolution reverb for creative sound design. It’s not about space; it’s about character.
Let's ground this in some practical applications. The second you stop thinking about "rooms" and start thinking about "textures," you can begin crafting sounds that are entirely your own.
Imagine you have a dry, uninspired drum machine loop. Instead of reaching for a standard room reverb, try processing it with an IR captured from the sympathetic vibrations of a grand piano's strings (you can do this by playing a loud clap right next to the open strings). The drum hits will excite those resonant frequencies, adding a ghostly, melodic sustain that is both percussive and tonal.
Or how about a lead vocal? You could run it through the IR of a cracked speaker cone to give it a gritty, distorted, and fragile texture. The vocal performance is still there, but now it carries the physical characteristics of broken equipment, adding a whole new layer of emotional depth and sonic interest. These kinds of experiments are foundational to creating unique sounds, and exploring the best sound design software can give you even more tools to manipulate and refine these creations.
The best part? You can build your own library of these weird sonic fingerprints. You don't need access to a world-class studio—all you need is a microphone and a curious mind.
Each of these recordings becomes a new color in your sonic palette. When you load one of these unconventional files into your convolution reverb plugin, you’re not just adding an effect—you’re inventing an entirely new instrument or sonic environment from scratch. This experimental mindset is what separates a good mix from an unforgettable piece of audio art.
Even when you've got the hang of the basics, working with something as deep as convolution reverb always brings up new questions. Let's dig into some of the most common things that pop up for producers and sound designers, so you can start using it with confidence.
This is the big one, isn't it? But honestly, it’s not really about one being "better" than the other. It’s about picking the right tool for the job. Most pros have both in their toolkit for very different reasons.
The bottom line? Reach for convolution when you need authenticity; grab an algorithmic reverb when you want to get creative and design the space from scratch.
In a word, yes. Generally speaking, convolution reverb demands more from your computer than its algorithmic cousin. The math involved—multiplying every single sample of your audio by every single sample of the impulse response—is pretty intensive. Modern machines can handle it, but you might feel the strain if you start loading multiple instances across a big session.
The classic pro workaround is to use sends. Set up your convolution reverb on an auxiliary track and "send" your instruments to it. This way, a single instance of the plugin can serve dozens of tracks, saving you a ton of processing power and making your mix more cohesive, since all those elements are sharing the same acoustic space.
You can technically load any audio file into a convolution plugin, but the results will be all over the map. Using a random sound file won't give you a traditional reverb because a proper IR is a very specific thing: a short, sharp, full-spectrum sound designed to capture a space's acoustic fingerprint.
If you load a vocal phrase or a drum loop as an "IR," you're not really creating reverb. Instead, you're imprinting the rhythmic and tonal character of that loop onto whatever you run through it. This is a fantastic trick for experimental sound design and creating bizarre new textures, but it's not the path to realistic reverberation.
You’re in luck—the internet is overflowing with high-quality IRs for every budget. A quick search for "free IR library" will give you thousands of options from generous engineers and hobbyists who have captured all sorts of unique spaces.
For more curated sounds, numerous commercial libraries sell meticulously recorded IRs from world-famous concert halls, rare vintage hardware reverbs, and other unique sources. These premium collections are a great way to get world-class sounds instantly. The development of convolution reverb was a huge leap forward, finally allowing us to digitally capture real acoustics with perfect accuracy. It was the culmination of a long journey, from the first spring reverb patent in 1939 to the earliest commercial digital units in the 1970s, all of which could only approximate the real thing. You can learn more about the rich history of reverb effects to see just how far we've come.
Ready to move beyond generic reverbs and create truly unique sonic textures for your projects? With SFX Engine, you can generate custom, royalty-free sound effects instantly using AI. Describe any sound you can imagine—from the subtle ambience of a futuristic cityscape to the resonant clang of an alien artifact—and bring it to life. Stop searching for the right sound and start creating it at https://sfxengine.com.