August 28, 2025 · Kuba Rogut
Ever put on a great pair of headphones and felt like you were right there in the room with the band? That's the magic of stereo imaging. It's the art of creating a three-dimensional soundscape between two speakers, giving every single sound its own specific place.
A powerful stereo image is what turns a flat wall of sound into a living, breathing environment you can almost step into. It's the illusion that lets you hear the singer front and center, the guitars off to the sides, and the drums spread out behind them.
Think of it like you're painting with sound. Instead of a two-dimensional canvas, you have a whole 3D space to work with. This is what separates a polished, professional track from a mix that just sounds crowded and amateur.
The real goal here is to build a believable "soundstage." You want the listener to be able to close their eyes and point to exactly where each instrument is playing. It goes way beyond just cranking a pan knob all the way left or right; it’s about carefully carving out a sense of depth, width, and realism.
A killer stereo image doesn't just happen by accident. It's built on a few fundamental concepts that all work together to trick our ears into hearing this expansive sonic space. Getting a handle on these is the first real step to mastering the spatial feel of your mixes.
To help break it down, here’s a quick look at the building blocks of any great stereo image.
| Component | What It Controls | Listener's Experience |
|---|---|---|
| Width | The side-to-side spread of sounds. | Creates a sense of space and separation between instruments. |
| Depth | The front-to-back placement of sounds. | Makes some elements feel up-close and others distant. |
| Balance | The even distribution of sonic energy. | Prevents the mix from feeling heavy on one side or empty in the middle. |
| Clarity | The distinctness of each sound. | Ensures every instrument has its own spot and doesn't get lost in the mud. |
Each of these components plays a crucial role. When they work in harmony, the mix just feels right.
A mix with good stereo imaging allows distinct instruments to be easily traced to a specific spot in the stereo field. This creates the width, depth, and 3D aspect that pulls a listener in.
Pulling this off means blending a whole toolbox of techniques, from simple panning to the more nuanced use of reverb, delay, and EQ. Even tiny tweaks can make a massive difference in how the listener perceives the space.
Of course, knowing your tools is half the battle, so getting comfortable with your chosen music production software for beginners is a must. And since dynamics play a huge role in perceived depth, it's also worth understanding https://sfxengine.com/blog/what-is-audio-compression to help shape your track's spatial character.
The real magic behind stereo imaging isn't just about speakers and technology; it's a clever hack of our own built-in survival tools. Your brain is a remarkable sound processor, constantly analyzing tiny auditory clues to build a 3D map of the world around you.
This whole process hinges on a couple of key principles. Think about it: when a sound comes from your left, it’s not just "over there." It physically hits your left ear a split-second sooner and a tiny bit louder than it hits your right ear.
Those incredibly subtle differences are everything.
Your brain instinctively decodes these two pieces of data to figure out where a sound is coming from. In the audio world, we've given them proper names:
Audio engineers play with ITD and ILD all the time. When a producer pans a guitar to the right, they're creating a fake ILD. When they introduce a micro-delay to one channel, they're manufacturing an ITD.
By mimicking these natural acoustic cues, we can place any instrument anywhere we want in the stereo field. We're essentially tricking the brain into hearing a wide, immersive soundscape that's coming from just two speakers.
This is a great way to visualize how time and level differences work together to create that feeling of width.
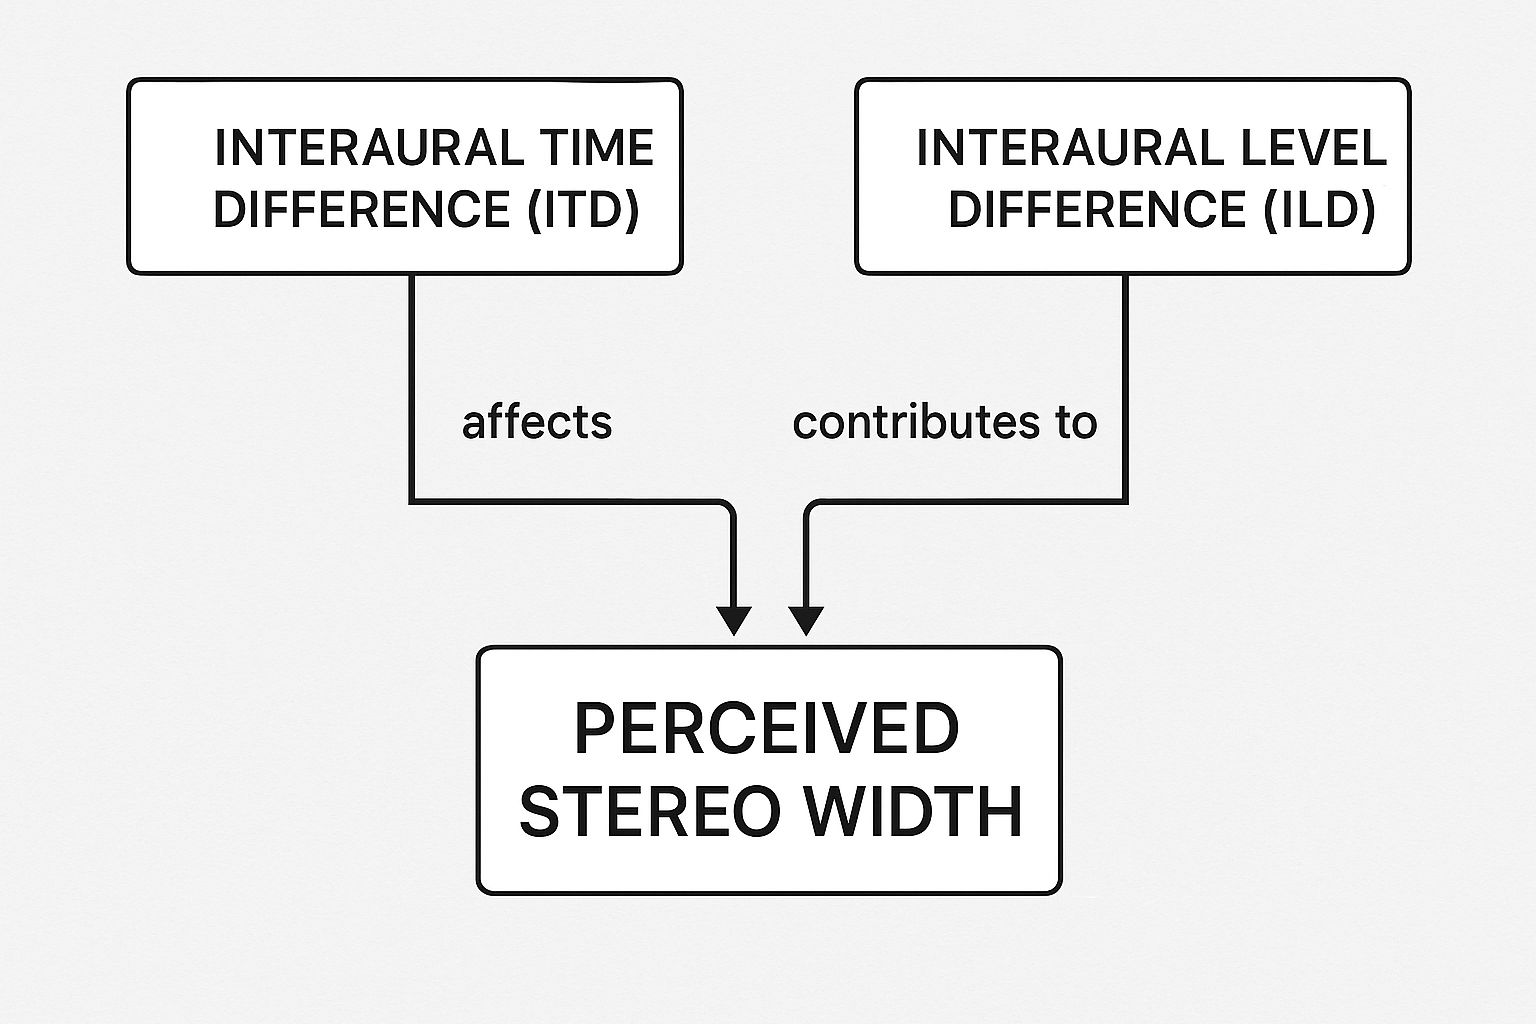
As you can see, both ITD and ILD are the raw ingredients our brain cooks with to create the final auditory picture. Getting a handle on these concepts is also crucial when you're choosing sound effects in video editing, as it helps build a believable and immersive world for the audience.
Think of panning as your primary tool for painting a sonic picture. It's how you place each sound on a canvas that stretches from the far left to the far right, giving every instrument its own spot on the stage. This isn't just about twisting a knob; it's a strategic move to create balance, avoid a cluttered mess, and let each part of your song breathe. It’s the first and most crucial step in building a wide, immersive stereo image.
Every great mix starts with a strong, solid center. The elements that anchor the song—the ones that drive the rhythm and carry the melody—belong right down the middle. This gives the track focus and punch.
Once that core is locked in, you can start pushing other elements out to the sides to build a sense of space.
This is where the magic happens and your mix starts to feel huge. By panning instruments that play off each other to opposite sides, you create a kind of conversation between them, making the whole track feel bigger. A classic rock trick is to pan two different rhythm guitar parts hard left and hard right, creating an enormous wall of sound. You can apply the same idea to synth pads, backing vocals, or even a pair of congas.
This trick we use in audio has a fascinating cousin in the visual world. Technologies like 3D movies and VR headsets use a principle called stereoscopy, which shows a slightly different image to each eye to create the illusion of depth. Whether it's for your ears or your eyes, the core idea is the same: separating the information for the left and right channels creates a powerful perception of space and dimension. You can dive deeper into the history of 3D imaging to see how far back this concept goes.
Don’t be shy with your panning. If you only pan things a tiny bit left or right, you’ll end up with a mix that still sounds crowded in the middle. Be bold! Push those supporting elements out to 9 o’clock (75% left) or 3 o’clock (75% right)—or even further—to get real separation.
Now, while panning is your best friend, you might be tempted to grab a stereo widening plugin to artificially stretch things out. Tread very carefully here. These tools often work by creating tiny time delays between the channels, which can sound wide and impressive at first. The problem? When your track is played on a mono system (like a club sound system or a Bluetooth speaker), these delays can cause nasty phase cancellation, making your mix sound thin, hollow, and weak. Always, always check your mix in mono to make sure it doesn’t fall apart.

While panning gives you the left-to-right spread, it’s depth that truly pulls the listener into the world you're creating. This front-to-back dimension is what separates a flat, two-dimensional track from an immersive, three-dimensional soundstage. You're essentially creating an illusion, using your tools to mimic how our ears perceive sound in a real physical space.
Your most powerful allies for crafting this depth are reverb and delay. Think about it: a sound with a ton of reverb (what we call a "wet" signal) instantly sounds like it's coming from far away, bouncing off distant walls. In contrast, a "dry" signal with little or no reverb feels right in your face—immediate and intimate.
You can get incredibly precise with this sense of distance by tweaking the settings on your reverb and delay plugins. Each knob and slider helps you sculpt the virtual room your instruments live in.
This whole quest for depth in audio has a fascinating parallel in visual media. The idea really took off in the 20th century, famously with the first 3D movie, 'The Power of Love,' back in 1922. It used stereoscopic principles to create a visual illusion of depth, much like we do with sound. The historical timeline of stereoscopy shows just how long we've been chasing this immersive experience.
Another brilliant, and often overlooked, tool for creating depth is your EQ. It's all about mimicking a simple law of physics: high frequencies lose energy and die out over distance much faster than low frequencies do.
You can copy this effect right in your DAW. By gently rolling off the high-end frequencies of an instrument with a low-pass filter, you trick the listener's brain into thinking it's positioned further back in the room. This simple move can make a background synth pad or a distant percussion loop sit perfectly behind a crisp, up-front vocal, making the whole mix feel so much more real.
We all chase that wide, immersive stereo image, but it's a path filled with common pitfalls that can quickly wreck a mix. Knowing what these traps are is the first step to crafting a pro-level soundscape that actually works on any system, not just in your studio.
The most common mistake? Going overboard with stereo widening plugins. These tools are tempting, promising an instant, massive sound. But what they often deliver is a host of phase problems that create more headaches than they solve. By playing with tiny time delays and phase tricks, they can make a track feel huge in headphones, only to sound hollow and weak when played in mono.
That brings us to a non-negotiable rule of mixing.
It's easy to forget, but so many playback systems out there are mono—think club PAs, laptops, and even your phone speaker. If your mix depends too much on artificial widening effects, it will simply collapse on these systems.
Phase cancellation is the big villain here. It's a nasty side effect of many widening plugins that can make your bassline lose its punch or your kick drum practically vanish. You have to be constantly flipping your mix into mono. It’s the only real way to know if your track will hold up in the real world.
Another classic error is the "hole-in-the-middle" mix. This happens when you pan everything hard left and hard right, leaving the center of your mix feeling empty and disconnected. A great mix needs a solid anchor. Your lead vocal, kick, and bass are the foundation—keep them planted in the center to give the track focus and power.
So, how do you fix this? Start by reaching for panning and EQ before you even think about a widener. For some more practical advice on getting that clarity and punch right, check out our guide on how to improve sound quality.
By sidestepping these common traps, you can build a stereo image that’s not just wide, but also deep, solid, and professional—no matter where someone presses play.
As you get your hands dirty with mixing, you'll find the same questions about stereo imaging pop up over and over. It's totally normal. Getting these fundamentals right is what separates a decent mix from a great one, so let's clear up a few things that often trip people up in the studio.
We'll tackle some key terms, talk about best practices, and give you some straightforward advice to help you put these ideas into action. Nailing these concepts will really solidify your whole approach to spatial audio.
I hear these two terms used interchangeably all the time, but they’re not the same thing. Knowing the difference is crucial if you want to create a mix that feels truly three-dimensional.
Stereo Width is pretty simple: it’s just the left-to-right spread of your mix. It answers the question, "How far out to the sides do my sounds go?"
Stereo Imaging is the whole sonic picture. It includes the width, of course, but it also covers depth (how close or far away things sound) and even a sense of height. It's about creating a full 3D stage where every single instrument has its own specific spot.
Just think of stereo width as one piece of the bigger stereo image puzzle. You can have a super-wide mix that still sounds flat and lifeless because it has no depth or clarity.
This is a big one. Making it a habit to constantly check your mix in mono is one of the most important disciplines you can learn as a producer. It feels like a step backward, but it's the ultimate reality check for your track.
A surprising number of playback systems are still mono—think of most club PAs, many smart speakers, and the background music systems in shops and restaurants. If your mix has phase cancellation problems, which often happen when you use aggressive stereo widening effects, entire instruments can get thin, quiet, or just vanish when collapsed to mono.
A mix that falls apart in mono is fundamentally a broken mix. Checking this ensures your track hits hard on any system, not just your expensive studio monitors or headphones.
Oh, absolutely. It's a classic rookie mistake to chase maximum width at all costs. Pushing everything out to the sides can actually do a lot more harm than good, often resulting in a mix that sounds hollow and unnatural.
This creates what engineers call the "hole-in-the-middle" effect. Your soundstage feels empty right down the center, and all the punch is gone. The listener's ears are pulled to the extreme left and right, but the core elements that drive the song—like the lead vocal, kick, and snare—get lost in that empty space.
The real goal is a cohesive, balanced soundscape, not just stretching things as far as they'll go. You need a strong central anchor to build a powerful, professional-sounding mix around.
Smart panning is all about creating contrast and making space for every element to breathe. Certain instruments are perfect for panning way out to the sides because they can add size and excitement without getting in the way of the main event.
A few great candidates for wide panning include:
Using these techniques carves out precious real estate right down the middle, giving your most important parts the clarity and impact they deserve.
Ready to create soundscapes as unique as your vision? With SFX Engine, you can generate custom, royalty-free sound effects instantly from a simple text prompt. Elevate your projects with the perfect audio, crafted by AI and ready for commercial use. Explore the possibilities at https://sfxengine.com.