February 12, 2026 · Kuba Rogut
At its core, the difference is simple: EQ sculpts a sound's tone by turning specific frequencies up or down, while compression controls its dynamics by managing how loud or quiet it gets.
Think of it like this: EQ is the color palette, and compression is the frame that holds the picture together.

Getting a handle on equalization (EQ) and compression is non-negotiable for making solid mixing decisions. They're both workhorse tools you'll reach for constantly, but they solve completely different problems. One deals with the frequency spectrum, the other with dynamic range.
Your equalizer is your go-to for all things tonal. It's a surgical tool that lets you boost or cut very specific frequencies in a sound. Got a vocal that sounds a bit muddy? An EQ can dip the low-mids causing that clutter. Need a sound effect to cut through the mix? A little high-frequency boost can add the sparkle it's missing.
A compressor, on the other hand, is like an incredibly fast, automatic volume knob. Its main job is to shrink the dynamic range—the gap between the loudest and quietest moments of your audio. This gives you a much more consistent, controlled sound. For example, a compressor is perfect for evening out a dialogue track, ensuring every word is clear without the listener having to constantly adjust their volume.
If you want to go deeper, our guide on what is audio compression breaks down exactly how it works.
The Bottom Line: Reach for an EQ when you want to change what a sound sounds like tonally. Grab a compressor when you need to control how its volume behaves over time.
To make this distinction even clearer, let's look at their main jobs side-by-side.
The choice between EQ and compression always boils down to one question: what problem are you trying to fix? Is it a tonal issue, like harshness or mud, or is it a dynamic issue, like inconsistent volume? Your answer tells you which tool to grab first.
To help you decide on the fly, here's a quick cheat sheet.
This table breaks down the core differences between an equalizer and a compressor, giving you a quick reference for when to use each.
| Attribute | Equalizer (EQ) | Compressor |
|---|---|---|
| Primary Function | Adjusts the volume of specific frequencies | Reduces the dynamic range of the entire signal |
| Core Purpose | Tone shaping and frequency correction | Dynamic control and volume consistency |
| Solves Problems Like | Muddiness, harshness, lack of clarity, tonal imbalance | Inconsistent volume, weak transients, lack of punch |
| Typical Use Cases | Removing rumble from dialogue, adding sparkle to cymbals, carving space for instruments in a mix | Evening out vocal levels, adding punch to drums, making basslines sit consistently in a track |
| Key Parameters | Frequency, Gain, Q (Bandwidth), Filter Type | Threshold, Ratio, Attack, Release, Makeup Gain |
| Analogy | A sculptor's chisel, shaping the material | A vise, tightening and controlling the form |
Essentially, your EQ shapes the material itself, while the compressor keeps that material contained and controlled within the mix. Both are critical for a professional-sounding result.
Before you can decide whether to reach for an EQ or a compressor, you need to get a feel for what each tool actually does. Think of their controls less like technical settings and more like creative levers you can pull to shape the tone and energy of your audio. Once you truly understand these parameters, making confident, professional mixing decisions becomes second nature.
This isn't just academic, either. In fields where audio quality directly affects your audience, this stuff matters. Industry stats show that podcasts using precise audio engineering—like smart EQ and compression—see a 28% higher listener engagement rate. That’s a huge difference, and it highlights just how much these tools can impact your final product. If you're curious, you can read more about how processing affects listener engagement on getlisten2it.com.
At its heart, an equalizer is your go-to for tonal sculpting. It lets you turn up or down specific frequencies in a sound. Imagine a set of hyper-precise volume knobs, each one controlling a different slice of the audio spectrum, from the deepest bass all the way up to the shimmering highs.
Here are the main controls you’ll be working with:
Practical Example: The high-pass filter is easily one of the most powerful tools in your EQ arsenal. Just by setting one around 80-100 Hz on a vocal track, you can instantly get rid of low-end rumble from a shaky mic stand or room noise, all without touching the actual character of the voice.
If EQ is for tone, a compressor is for dynamics. It’s an automatic volume controller that turns down the loudest parts of your audio, resulting in a more consistent and even level. This is how you make a sound feel more present and glued into the mix, rather than jumping out all over the place.
Here are the essential knobs and what they do:
Once you have a handle on these controls, you can stop just fixing problems and start creatively shaping your audio to fit perfectly, whether you're working on a film, a video game, or a podcast.
Ask any two audio engineers about the “right” order for EQ and compression, and you’ll likely get three different answers. The truth is, there’s no single correct way. The classic debate of EQ before or after compression isn't about right or wrong; it’s about intent. Your choice completely changes how these tools interact and, ultimately, shapes the final sound.
The whole decision boils down to one simple question: Are you trying to fix a problem or creatively enhance the sound? This is the fundamental fork in the road.
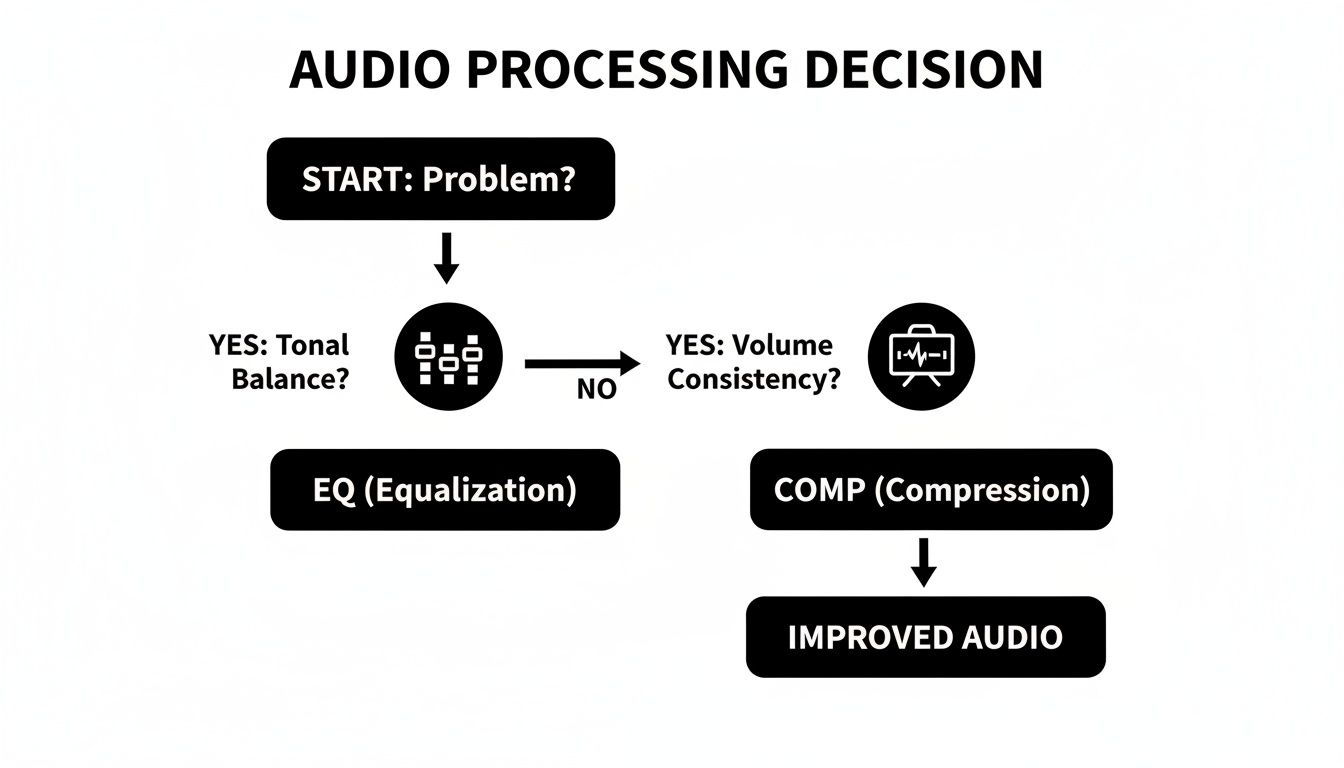
As the flowchart shows, identifying the core issue is always step one. Once you know what you're trying to achieve, the right tool—and its placement in your chain—becomes obvious.
Placing an EQ before the compressor is the go-to move for most pros, especially for cleanup work. The idea is simple: tidy up the audio before anything else touches it. Think of it as prepping a surface before you paint.
When you use subtractive EQ first, you’re carving out problematic frequencies so the compressor doesn't have to deal with them. Imagine a boomy sound effect with a big, muddy resonance around 150 Hz. If that hits a compressor first, the compressor will overreact and "pump" every time that low-end rumble appears, squashing the entire sound.
By putting an EQ first and cutting that problematic boominess, you’re feeding the compressor a much cleaner, more balanced signal. Now, it only reacts to the actual dynamics of the performance, not a rogue frequency. The result is transparent, effective compression that just works better.
Key Takeaway: Use EQ before compression to surgically remove what you don't want. This cleans the signal, allowing the compressor to manage dynamics more effectively without being triggered by problem frequencies.
So, when does EQ go after? When you're ready to get creative. This is where additive EQ comes in. Once a compressor has tamed the peaks and valleys, the overall tonal character of the sound often changes. Quieter parts are brought up, which can sometimes dull the sparkle or beef up the mids in ways you didn't expect.
This is the perfect time for a post-compressor EQ. With the dynamics already locked in, you can add broad, musical boosts to bring a sound to life. For example, after you’ve compressed a vocal to make it sit perfectly in the mix, you might add a gentle high-shelf boost around 10 kHz to reintroduce some "air" and presence that the compression may have softened.
Because you’re EQing a dynamically controlled signal, your boosts won't suddenly create new peaks that send the compressor into a frenzy. You're simply polishing a sound that’s already stable.
Of course, you don’t have to choose. For critical sounds, the best solution is often to do both. The "sandwich" technique is a tried-and-true workflow that gives you the best of both worlds.
Here’s how it works:
This hybrid model delivers surgical precision and broad artistic control in one elegant chain. It's a go-to strategy for anything that needs to be front-and-center, from lead vocals to hero sound effects.
Knowing the theory is one thing, but getting your hands dirty is where you really start to hear the difference. When you're staring at a raw track, the decision to reach for an EQ or a compressor becomes much more intuitive once you’ve worked through a few common scenarios. Let's walk through some reliable starting points for vocals, drums, and sound effects—staples for podcasters, producers, and game developers alike.
Think of these workflows less as rigid rules and more as proven signal chains that just flat-out work. They’re a solid foundation you can always tweak to fit the unique character of whatever you're mixing.
Whether you're working on dialogue, a podcast, or a lead vocal in a song, the end goals are almost always the same: clarity and consistency. You need every word to be understood, and you want the level to feel stable so your listener isn't constantly riding the volume fader. This is where the classic "EQ-Compressor-EQ sandwich" really shines.
1. Corrective EQ (The First Slice of Bread): First, we clean things up. The idea is to surgically remove problem frequencies before they hit the compressor, so the compressor isn't reacting to junk that shouldn't be there in the first place.
2. Dynamic Control (The Filling): Now that the signal is clean, the compressor can do its job much more effectively. For vocals, the aim is usually transparency—you want to smooth out the volume without making it sound compressed.
Pro Tip: If you find one compressor is working too hard and sounding strained, try serial compression. Use one compressor to gently shave off just the very loudest peaks, followed by another to provide more consistent overall leveling. It's a classic trick for getting that smooth, broadcast-ready vocal sound.
3. Creative EQ (The Top Slice): With the dynamics tamed, you can now add some shine and character. Any boosts you make here will sound much smoother because the compressor is keeping everything in check.
This three-step process—clean, control, and enhance—is a surefire way to get great-sounding vocals every time.
Drums are all about impact. Here, your EQ and compression moves are often bolder and more aggressive because you're trying to shape the transients—that initial crack of the drumstick—and lock down the groove.
Let's break it down for the kick and snare, the heart of any beat.
Kick Drum Workflow:
Snare Drum Workflow:
In film and games, EQ and compression become storytelling tools. They can make an effect sound larger than life, or they can help it sit perfectly within its acoustic environment.
Take a simple explosion sound, where the goal is maximum drama.
Once you've got a handle on standard EQ and compression, a whole new world of hybrid tools opens up. These advanced techniques merge the best of both worlds, giving you a level of surgical precision that just wasn't possible before. Think of them as the secret weapons the pros pull out to solve tricky mixing problems with elegance and transparency.
These aren't just for music producers, either. They are absolutely essential for dialogue editing, sound design, and broadcast audio. Getting comfortable with them is a huge step toward getting that polished, professional sound, no matter what you're working on.
Imagine an EQ that only turns on when a certain frequency gets too loud. That’s the magic of a Dynamic EQ. It combines the pinpoint accuracy of a parametric EQ with the threshold-based brain of a compressor, resulting in a tool that’s both reactive and incredibly smart.
Instead of making a static cut that affects the sound all the time, a dynamic EQ band only kicks in when the signal in its frequency range crosses a threshold you set. This is a complete game-changer for fixing problems that only pop up now and then, without carving out the soul of your track when the issue isn't there.
Common Uses for Dynamic EQ:
If Dynamic EQ is a smart equalizer, then Multiband Compression is a smart compressor. It works by splitting the audio into several frequency bands—usually three to five—and letting you compress each one completely independently.
This means you can clamp down on the booming low-end of a bass guitar without messing with its midrange definition or the nice string buzz up top. Each band gets its own threshold, ratio, attack, and release, giving you an insane amount of control over the dynamics of specific parts of the sound.
Key Insight: Reach for multiband compression when a standard, full-band compressor is too blunt of an instrument. It lets you fix a dynamic problem in one area (like a boomy bass) without squashing another (like a snappy midrange).
Also known as "New York Compression," Parallel Compression is a legendary technique for adding punch and body to a track without killing its natural dynamics. The trick is that you don't insert a compressor directly on your track. Instead, you create a copy of the track (or use an effects send).
One track is left totally clean and uncompressed, preserving all the original life and punchy transients. The other track gets absolutely slammed with compression—think high ratios and fast attack times—to create a dense, powerful, and sustained signal. Then, you simply blend this hyper-compressed signal back in underneath the original.
The result is truly the best of both worlds: you get the weight and energy from the compressed signal and the natural, breathing dynamics from the original. This is a go-to move for making drums, vocals, and bass sound absolutely massive. To learn more about getting that final polish, our complete guide explains how to master audio for professional results.
Sidechain Compression is where things get really creative. It’s a technique where the compressor on one track is actually triggered by the audio from a completely different track. The compressor is listening to the "sidechain" input to decide when to turn down the volume, but it's applying that volume reduction to the track it's placed on.
This creates a "ducking" effect, where one sound automatically makes way for another.
Classic Sidechain Scenarios:
Diving into audio processing can feel like a rabbit hole, especially with tools as fundamental as EQ and compression. It's one thing to know what the knobs do, but understanding why you're turning them is what separates a good mix from a great one. Let's tackle some of the most common questions that come up in real-world projects, moving from just applying effects to truly sculpting sound with purpose.
These aren't just textbook theories; they're the practical hurdles you'll face every day. Getting these concepts locked in will make your workflow faster, more intuitive, and ultimately, more creative.
Definitely not. In fact, one of the biggest mistakes I see beginners make is slapping a chain of plugins on every single track out of habit. The first and most important rule in mixing is to listen first. Before you even think about reaching for a plugin, ask yourself: what’s the problem here?
Is the track a bit muddy in the low-mids? Does it sound harsh or thin? An EQ is probably what you need. Or is the performance all over the place dynamically, with some words getting lost and others jumping out? That's a job for a compressor. Sometimes, a well-recorded track sounds perfect as it is and doesn't need anything at all.
Key Takeaway: Think of EQ and compression as problem-solvers, not mandatory checklist items. Default processing can easily suck the life and natural feel out of an otherwise fantastic recording. Let your ears, not a template, be the final judge.
Absolutely. While a compressor’s main job is to control dynamics, it has a massive impact on the tonal character of a sound. This happens in a couple of ways. First, a compressor turns down the loud parts of a signal. To compensate, you usually turn up the makeup gain, which brings the entire signal's level back up. This process lifts the volume of all the quieter details—things like room ambience, subtle instrument resonances, or the decay of a reverb tail.
When you bring up those quiet elements, you change the overall frequency balance. For example, the sustained body and ring of a snare drum become louder relative to the initial crack, making the drum sound fatter and warmer.
The second reason is all about the attack and release settings. These have a huge effect on a sound's transients, which are the key to its perceived tone.
This tonal-shaping side effect is a big reason why many engineers will place an EQ after the compressor. The compressor shapes the dynamic feel, and the EQ then fine-tunes the new tonal balance that results.
The main difference here really comes down to control. Both tools adjust frequencies, but they offer vastly different levels of precision.
A Graphic EQ gives you a set of sliders, each one tied to a specific frequency band. The bandwidth (or Q) is fixed, so you can only boost or cut that predefined area. Think of the simple bass/mid/treble controls on an old stereo, just with a lot more bands. They’re great for making quick, broad-stroke changes, which is why you see them so often in live sound setups where speed is everything.
A Parametric EQ, on the other hand, gives you surgical control over three key parameters for every single band:
This level of detail is why parametric EQs are the undisputed king in any studio or post-production environment. They let you solve very specific problems without messing up the frequencies around them.
When you’re working with sound effects, EQ and compression become storytelling tools. It's less about musicality and more about creating a sense of realism, immersion, and impact. You're trying to convince the listener that the sound belongs in its world.
Using EQ for Environment and Perspective EQ is your best friend for placing a sound in a physical space. Using filters, you can totally change the listener's perception of distance. For instance, if you take a footstep sound and apply some heavy high-pass and low-pass filters, you can instantly make it sound like it's coming from another room or through a wall. Rolling off high frequencies makes a sound feel farther away, while a little high-end boost can bring it right up close.
Using Compression for Impact and Control Compression is all about shaping the dynamics of a sound effect to match what's happening on screen. For a massive explosion, you might slam it with a fast, heavy compressor to squash the initial peak and bring up the roar of the sustained fireball and debris. For a background sound like gentle rain, you'd use much more subtle compression just to keep it sitting consistently in the mix, so it never gets distracting or disappears completely. The goal is always to make the sound believable in its context.
Ready to create your own unique audio? The SFX Engine uses AI to generate custom, royalty-free sound effects from a simple text prompt. Find the perfect sound for your film, game, or podcast without searching through endless libraries.