October 18, 2025 · Kuba Rogut
Let's be real—nothing tanks a great recording faster than distracting echo. That hollow, roomy sound immediately signals "amateur" and can be a huge turn-off for your audience. Before we even touch any software, it’s worth understanding exactly what we're fighting against.
Of course, the best way to remove echo from sound is to stop it from happening in the first place. But if you’re working with audio that’s already been recorded, your best friend is post-production software equipped with dereverberation effects. These tools are designed to intelligently analyze an audio track and separate the direct, original sound from all those unwanted room reflections.

Here's something I see trip people up all the time: the confusion between echo and reverberation (or reverb). They're related, but they're not the same beast.
So, most of the time you think you're hearing "echo," you're actually dealing with excessive reverb. It’s caused by sound waves from your voice or instrument hitting hard surfaces—walls, floors, ceilings, desks—and ricocheting right back into your microphone.
The classic recipe for a reverb disaster: A sensitive condenser microphone placed in an untreated room full of hard, reflective surfaces. It’s a surefire way to get a muddy, unprofessional recording.
The most effective fix is to treat your room before you ever hit record. Tackling the problem at the source always yields the best results. We've put together a whole guide on acoustic treatment for home studios that walks you through practical, budget-friendly ways to do just that.
But hey, sometimes you inherit a recording you didn't make, or you’re stuck recording in a less-than-ideal space. That’s when you turn to your second line of defense: post-production software. These powerful plugins can dig into the audio, find those pesky reverb tails, and turn them down, leaving you with a much cleaner, more direct, and professional-sounding track.
To really tackle echo and reverb, you’re going to need the right software. The good news is, you don’t have to spend a fortune, but knowing what to pick depends on your budget, your experience, and just how bad that echo problem is.
If you're just getting started or money is tight, a free editor like Audacity is a fantastic place to begin. It's a surprisingly powerful open-source tool that can handle a lot of basic audio cleanup without costing a dime. There are plenty of great options out there, so it's worth exploring the best free audio editing software to find one that fits your style.
Now, if audio is your bread and butter, investing in a professional Digital Audio Workstation (DAW) will change your life. Something like Adobe Audition or Logic Pro offers a much smoother workflow and a whole suite of advanced tools that can save you a ton of time. They're the industry standard for a reason.
For those recordings that are absolutely swimming in reverb, you need to bring out the big guns: a specialized dereverberation plugin. These tools are light-years beyond a simple noise gate or EQ filter.
Plugins like iZotope RX De-reverb or Waves Clarity Vx are incredibly smart. They use complex algorithms to analyze the audio, figure out what’s the direct sound (like a person's voice) and what’s the reverb tail (the room's echo), and then let you surgically reduce that echo. It’s pretty amazing tech, with roots going all the way back to the echo cancellation systems developed for satellite calls in the 1960s at AT&T Bell Labs.
Pro Tip: Less is almost always more with these plugins. Start with a very gentle setting and listen carefully. If you push it too hard, you’ll end up with weird, unnatural artifacts in your audio. The goal is to control the reverb, not obliterate it entirely.
Ultimately, picking the right tool is about matching its capabilities to your specific problem. A free editor can handle minor cleanups just fine, but for a recording drenched in echo, a professional DAW with a dedicated plugin gives you the precision you truly need.
Audacity is a fantastic free tool, but let's be clear: it doesn’t have a magic "remove echo" button. Getting good results is all about a strategic combination of its built-in effects to surgically reduce the reverb that’s causing you headaches. Think of it less as a sledgehammer and more as a series of precise, careful adjustments.
Let's work through a real-world scenario. Imagine you're cleaning up a podcast interview, but one speaker sounds like they recorded their part in a tiled bathroom. The goal here is to fix the echo without making their voice sound thin or unnatural.
Your first move is to give Audacity a clean sample of the problem itself. Find a few seconds of "silence" in your recording—a spot where the person isn't talking but you can still hear the echo of the room hanging in the air. This is your room tone, and it's gold.
Highlight this little section of audio. Now, head over to Effect > Noise Removal and Repair > Noise Reduction. In the pop-up window, click "Get Noise Profile." This is a critical step because you're essentially teaching Audacity what the unwanted room sound sounds like, completely separate from the actual voice. By analyzing this specific audio fingerprint, the software knows exactly what to target across the rest of the track.
This visual guide breaks down the core workflow for this kind of audio cleanup.
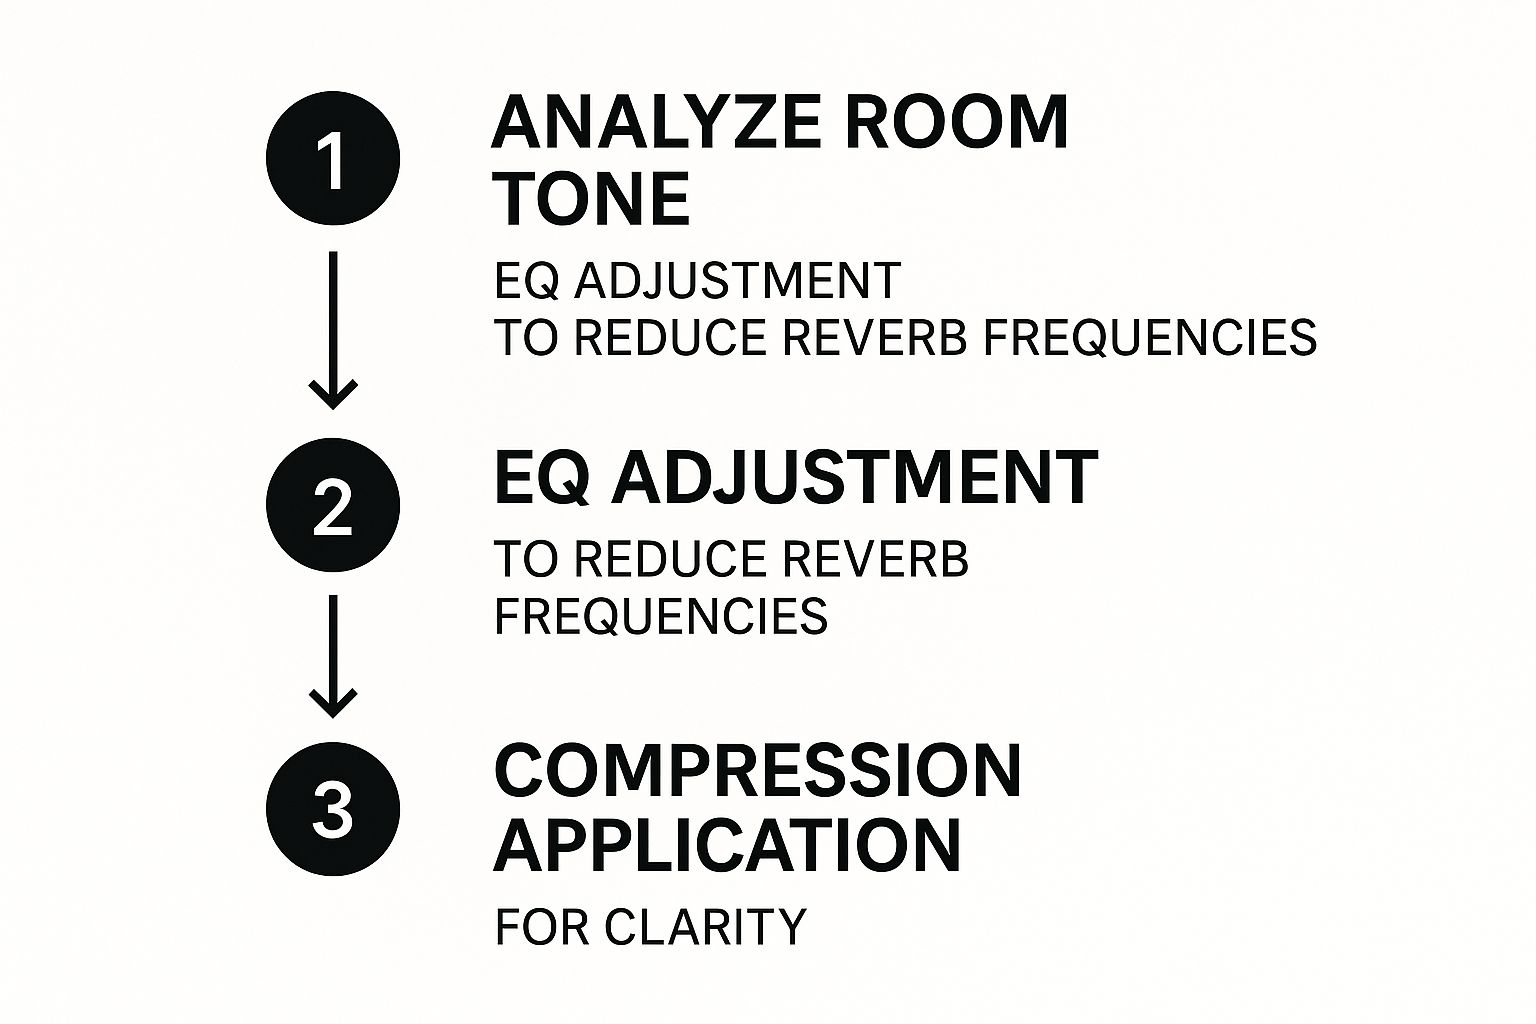
Following this sequence helps you make informed, targeted adjustments instead of just slapping on broad effects that might do more harm than good.
With the noise profile captured, select your entire audio track and open the Noise Reduction effect again. This time, you'll actually apply the effect. Start with gentle settings and hit the preview button.
I usually begin with these values as a baseline:
This won't completely remove echo from sound, but it should tame it significantly. Now, it's time to bring in your next tool: the Graphic EQ. You can find it under Effect > EQ and Filters > Graphic EQ.
Most of that boomy, echoey sound lives in the mid-range frequencies, typically between 400 Hz and 2 kHz. Carefully start lowering the sliders in this range. Keep listening. You're looking for that sweet spot where the echo fades away, but the natural body of the voice remains intact.
Pro Tip: Make small, incremental EQ adjustments and use that preview button religiously. Overdoing it is the fastest way to get a thin, robotic-sounding vocal.
Finally, a light touch of compression can work wonders. The Compressor (Effect > Compressor) helps even out the volume levels. This brings the quieter parts of the dialogue forward while pushing down those lingering reverb tails from the louder parts. Start with a low ratio, something like 2:1, and adjust the threshold until the dialogue sounds cleaner and more consistent.
When basic EQ tweaks just won't cut it for audio swimming in echo, you have to bring in the big guns. This is where dedicated dereverberation plugins come into play. These aren't your average filters; they are purpose-built, intelligent tools designed to surgically remove echo from sound.
They work by analyzing the audio to tell the difference between the direct sound you want (like a person's voice) and the messy reverb tail you don't.
https://www.youtube.com/embed/pXTl1IOuf64
Think about a common nightmare scenario: you've got an interview recording from a huge, empty conference room. The speaker's voice is technically clear, but it's immediately followed by that distracting, cavernous room sound. This is the exact problem that a plugin like iZotope RX De-reverb or Waves Clarity Vx was made to solve. Using complex algorithms, these tools can actually profile the reverb and pull it away from the original signal.
Instead of just broadly cutting frequencies, these plugins give you granular control over the room sound's characteristics. You're not just taking a wild guess; you're telling the software exactly how to handle the reverb.
You'll almost always run into two critical controls:
Pro Tip: A classic beginner mistake is overdoing it. Pushing the effect to get a completely dead, anechoic sound almost always leaves you with a robotic vocal full of weird digital artifacts. The goal is control, not total annihilation of the room's natural character.
Let's walk through that conference hall example. First, you'd insert your dereverb plugin on the dialogue track. A great starting point is the "Learn" feature, which many of these plugins have. Let it analyze a section of the recording where the echo is prominent, and it will build a custom profile of the room's reverb.
Now, start by gently increasing the main reduction amount. Listen carefully as you do this. If you hear any strange "pumping" sounds or the voice starts to sound thin and watery, you've gone too far.
Next, you can fine-tune the Reverb Time control to specifically attack those long, smeary tails without thinning out the core dialogue. Finally, use that Dry/Wet mix to blend the processed signal back with the original. The aim is a final product that sounds clean and intelligible, but still sounds like a real person speaking in a real space.
Choosing the right tool often depends on the severity of the echo and your budget. Here’s a quick comparison of the most common software-based approaches.
| Method / Tool | Best For | Cost | Skill Level |
|---|---|---|---|
| Basic EQ (Subtractive) | Very subtle room reflections, minor "boominess" | Free (DAW stock) | Beginner |
| Gate/Expander | Removing echo between phrases in quiet recordings | Free (DAW stock) | Intermediate |
| Dedicated Dereverb Plugin | Moderate to severe echo and reverb in critical audio | $$ - $$$ (Premium) | Intermediate |
| AI-Powered Voice Isolation | Complex audio with background noise and echo | $ - $$ (Subscription) | Beginner |
Each method has its place. While stock plugins are great for minor fixes, nothing beats a dedicated dereverb tool when you need to rescue an important recording from a problematic room.
The best way to fix an echo problem? Don't have one in the first place. Seriously. While post-production tools can work some magic, nothing beats getting a clean, crisp recording right from the source. This all comes down to managing your recording space, even if that space is just the corner of your bedroom.
Your first line of defense is your microphone. A lot of home-based creators start with a condenser mic, like a Blue Yeti. The problem is, these mics are designed to be incredibly sensitive and capture everything—including the sound of your voice bouncing off the walls.
For most home recording situations, you're much better off with a dynamic microphone. A great, affordable option is the Audio-Technica ATR2100x. Mics like this typically have a cardioid pickup pattern, which means they mostly hear what's directly in front of them and do a fantastic job of ignoring sounds from the sides and back. It's a game-changer for untreated rooms.

You don't need to spend a fortune on acoustic panels to get a decent sound. The main goal is just to add soft surfaces to your room to stop sound waves from bouncing around.
Here are a few tricks I’ve used over the years that work surprisingly well:
Don't knock it 'til you try it. I once salvaged a remote podcast interview by asking the guest to drape a heavy duvet over their head and desk. It looked absurd, but the audio sounded a hundred times better.
This whole idea of controlling unwanted sound isn't new; it's the same principle behind noise-canceling headphones. While echo and ambient noise are different beasts, the goal is the same: a cleaner audio experience. The technology has been evolving for decades, and you can actually learn more about its history on the Bose website.
When you're dealing with audio cleanup, a few questions always seem to pop up. Getting straight answers can save you a ton of time and frustration, and it helps you know what's actually possible. Let's dig into the common queries that come up when you need to remove echo from sound.
Honestly, no. At least, not if you want the original audio to sound natural.
While today's software is pretty amazing, trying to surgically remove severe echo or reverb almost always leaves behind some trace. Think of it like trying to take the eggs out of a baked cake. Aggressive processing can lead to weird digital artifacts and a hollow, unnatural sound.
The best strategy is always prevention. But when you can't prevent it, the goal should be significant reduction and control, not total removal.
Yes, and this is a really important distinction because it changes how you fix the problem.
Most of the time, what people call "echo" in their home recordings is actually too much reverb. Getting this right is as crucial as knowing how to tackle microphone background noise, which can also make or break your audio quality.
The key takeaway is that you're usually fighting a dense cloud of reverb, not a single distinct echo. This understanding shifts your approach from simple deletion to surgical reduction.
They sure can, and they've gotten remarkably good at it.
Many modern tools now use AI to intelligently figure out what's the desired voice and what's the unwanted room sound. Plugins like Waves Clarity Vx or services like Adobe Podcast's Enhance Speech are trained on massive datasets to isolate the primary signal. They often deliver incredible one-click results, making them fantastic options when you need a good fix, fast.
Ready to create custom sound effects that are clean from the start? SFX Engine offers an AI-powered platform to generate unique, royalty-free audio for any project. Skip the post-production headaches and craft the perfect sound instantly at https://sfxengine.com.