January 30, 2026 · Kuba Rogut
Before you can build a truly immersive soundscape, you have to get familiar with the core tools Unity gives you. Think of it this way: your sound files are the instruments, but Unity's components are the orchestra pit where everything comes together. Getting this foundation right is the difference between audio that just exists and audio that truly enhances the player's experience.

Let's break down the essential building blocks. Mastering how these pieces interact is non-negotiable for creating professional-sounding games. It all starts with three key components working in concert.
This isn't just about dragging and dropping components, though. It's about developing a workflow. A little organization upfront will save you from a massive headache later when your project is swimming in unnamed audio files and mismatched settings.
At the heart of it all, you have a simple but powerful relationship between three parts.
.wav, .mp3, or .ogg, this is the sword slash, the musical score, or the character dialogue you’ve imported into your project.So, the flow is simple: an AudioListener hears an AudioSource playing an AudioClip. That’s it. Every sound you hear in a Unity game is a result of this fundamental trio.
To help you keep these straight, here's a quick-reference table summarizing their roles.
| Component | Primary Role | Key Use Case |
|---|---|---|
| AudioClip | Holds the audio data (the sound file). | A footstep .wav file in your project assets. |
| AudioSource | Plays an AudioClip from a GameObject. | Attached to an enemy to emit a growl sound. |
| AudioListener | Receives input from all AudioSources. | Placed on the Main Camera to hear what's nearby. |
This table serves as a great mental checklist when you're setting up new sounds in your scene.
A clean project is a manageable project. Before you even think about importing your first sound, do yourself a favor and set up a logical folder structure. A tried-and-true method is to create a top-level _Audio folder and then branch out from there.
For instance, your asset tree could look something like this:
_Audio/SFX/Player/Footsteps_Audio/SFX/Environment/Doors_Audio/Music/Combat_Audio/UIThis kind of structure makes finding what you need incredibly fast, especially as your project scales. To take it a step further, adopt a naming convention, like SFX_Player_Footstep_Grass_01.wav. If you're new to all this, our guide on the fundamentals of game audio offers more foundational tips.
A well-structured audio library is non-negotiable for serious development. It not only speeds up your workflow but also makes collaboration with sound designers infinitely easier. Time invested in organization is never wasted.
The file format you choose has a direct impact on both audio fidelity and your game's performance. Unity works best with WAV, MP3, and Ogg Vorbis, and knowing when to use each is key.
There's a reason Unity is such a powerhouse, powering a staggering 51% of all games released on Steam in 2024. Its dominance, especially in the indie and mobile space, comes from flexible and robust systems just like this, allowing developers to fine-tune audio for optimal performance on any platform.
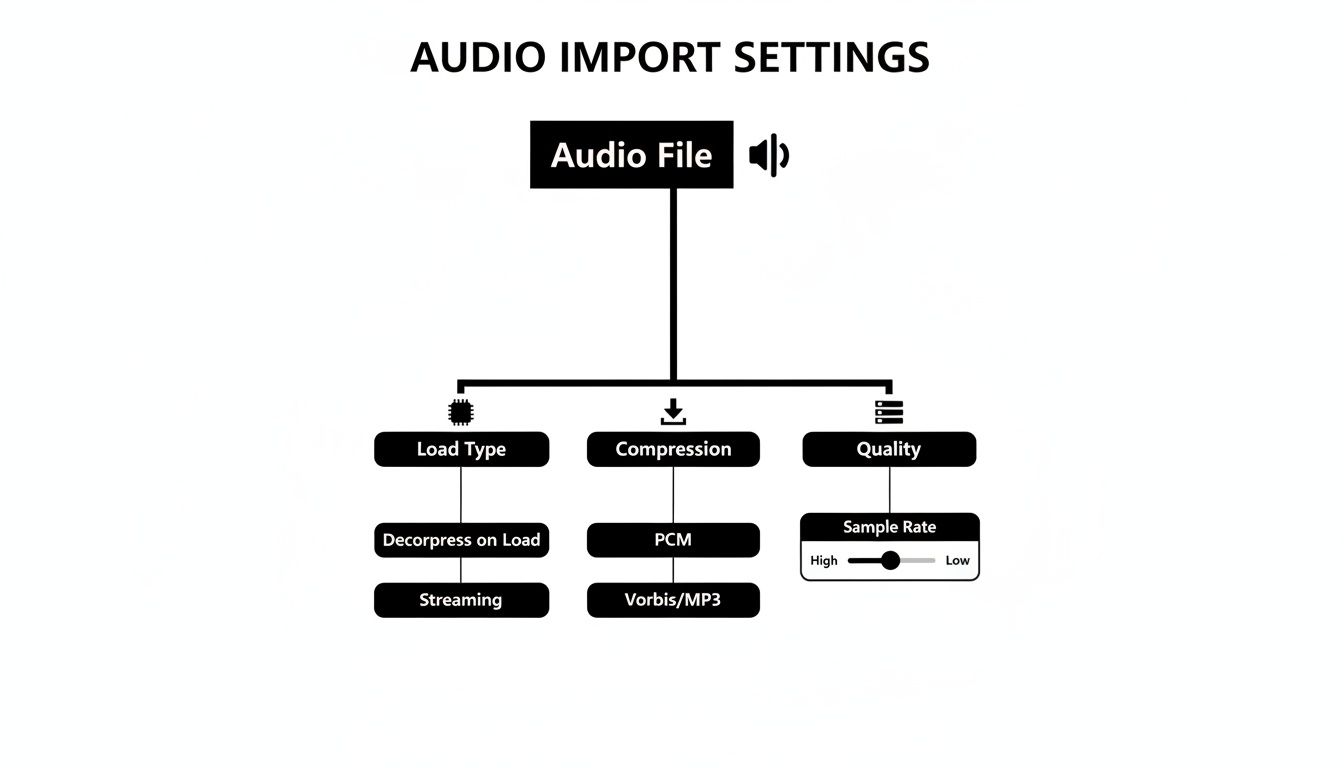
Alright, let's get our hands dirty. Bringing audio into Unity is more than just dragging a file into your project folder. The settings you pick right here, at the very beginning, will make or break your game's performance later on. Trust me, spending a few extra minutes on this now saves you from massive optimization headaches down the line.
When you click on any audio file in your Project window, the Inspector panel comes alive with options. These settings are your direct instructions to the engine on how to handle that sound. Should it be pre-loaded into memory? Streamed from the disk? Compressed? Your choices here need to be intentional, based entirely on what that sound does in your game.
I find it helpful to think of audio assets in three buckets: short and snappy sound effects (SFX), longer background music or ambient loops, and dialogue. You can't treat them all the same. A one-size-fits-all approach is a surefire way to bloat your memory budget or introduce frustrating audio lag.
Let's walk through the settings that truly matter.
My Advice: For any sound that doesn't need to play the very second a scene begins, turn off "Preload Audio Data." This one tweak can dramatically speed up your scene's initial load time, especially in levels packed with diverse environmental audio.
This is probably the most critical choice you'll make on import. The Load Type dictates how Unity juggles the audio data in memory while the game is running. Get this wrong, and you'll either devour your RAM or introduce noticeable latency.
Here’s my cheat sheet for picking the right one:
| Load Type | When to Use It | The Trade-Off |
|---|---|---|
| Decompress on Load | Short, common SFX (footsteps, gunshots, impacts). | Uses more memory, but has almost no CPU cost to play. Super fast. |
| Compressed in Memory | Medium-length sounds you don't play constantly. | A good balance. Saves RAM but needs a little CPU power to decompress on the fly. |
| Streaming | Long files like music, ambient beds, and voiceovers. | Tiny memory footprint, but a constant (though small) CPU and disk I/O cost. |
Let’s make this real. Imagine you have a footstep sound. It's short, it plays all the time, and it needs to be perfectly synced to the animation. The clear winner is Decompress on Load. This puts the raw, uncompressed audio right into RAM, ready to play instantly with zero delay.
Now, think about your game's main theme—a five-minute orchestral piece. Using Decompress on Load for that would be a disaster, eating up a huge chunk of RAM. This is a job for Streaming. It reads the music from the disk in little bits as it plays, keeping the memory usage incredibly low. This kind of resource management is what separates a smooth game from a stuttering one, and it's a cornerstone of any good unity audio integration guide.
Once your sound files are imported and configured, it's time to actually make them play in your game. This is where two key Unity components come into play: the AudioSource and the AudioMixer.
Think of an AudioSource as a virtual speaker you attach to an object in your scene. The AudioMixer, on the other hand, is like the soundboard in a recording studio. It’s where you balance all your individual "speakers," add global effects, and control the final mix that the player hears. Getting these two to work together is the core of any solid audio setup in Unity.
Let's start by giving an object a voice. Imagine you have a treasure chest that needs to make a creaky sound when it opens. The first thing you'd do is select that treasure chest GameObject and add an AudioSource component to it.
In the Inspector for that new component, you'll find an AudioClip slot. This is where you drag and drop your imported sound file, say SFX_Chest_Creak_01.wav. Just like that, your virtual speaker is loaded with the right sound.
But how do you tell it when to play? You've got a few options:
OnClick() event lets you drag in the AudioSource and simply select the AudioSource.Play() function from a dropdown.GetComponent<AudioSource>().Play();. This lets you trigger the sound based on any game logic imaginable—player input, animation events, physics collisions, you name it.Playing a single sound is easy enough, but what happens when you have dozens, or even hundreds, playing at once? It can turn into a mess pretty quickly. This is precisely the problem the AudioMixer solves. It's a central hub for routing all your game's audio, letting you control volumes and apply effects on a massive scale.
The key concept here is Groups. Instead of having every AudioSource output directly to the player's speakers, you funnel them through different channels in your mixer.
A common professional workflow is to create separate groups for the main audio categories: one for Music, one for SFX, one for UI sounds, and maybe another for Dialogue. This organization is the foundation for building a dynamic and polished audio experience.
This diagram shows the kind of import settings you’ll be managing before the sounds even get to the mixer.
With your sounds properly grouped in the mixer, you can now do things like turn down the volume of all sound effects at once or apply a reverb effect only to the dialogue track. It gives you an incredible amount of creative freedom. For a more detailed walkthrough, check out our guide on how to implement sound effects in Unity.
Alright, now that you've got the basics down, it’s time for the fun stuff. This is where we go beyond just making noise and start breathing life into your game world. Techniques like spatialization and dynamic mixing are what separate a functional soundscape from one that truly pulls the player in, making the environment feel tangible and alive.
Think of these as the professional polish that players feel, even if they can't quite put their finger on why. It’s all about creating an audio experience that reacts to every move and every change in the environment.
Making a sound feel like it's actually coming from a specific point in the game world is the magic of spatial audio. Thankfully, Unity's AudioSource component makes this surprisingly straightforward. The real key is the Spatial Blend slider.
This one setting controls how much a sound is treated as 2D versus 3D.
For instance, a distant explosion needs that full 3D treatment to sell its location. On the flip side, a narrator’s voiceover should be 2D so it remains clear and present no matter what’s happening on screen.
Don't overlook the Doppler Level, either. This simulates the classic Doppler effect—that change in pitch you hear as a siren screams past you. While setting it to 1 is technically realistic, it can sound a bit over-the-top in a game. I’ve found that a subtle value, maybe around 0.3 to 0.5, adds a fantastic touch of realism to fast-moving objects without becoming a distraction.
So, how do you change the entire feel of your game's audio in an instant? Picture this: your player dives underwater. Immediately, every sound should become muffled, low-pass filtered, and distant. Trying to script this for every individual sound source would be a nightmare. This is exactly what Audio Snapshots are for.
Snapshots are essentially saved states of your AudioMixer. You can set up distinct snapshots for any game state you can imagine—"Normal," "Underwater," "Paused," "InACave." Each snapshot stores a complete configuration of volumes, EQs, and effects for every group in your mixer.
To switch between them, you just make a single function call from your code. The real beauty is that you can tell it to transition smoothly over a few seconds, blending from one sonic environment to the next without any jarring cuts.
By using snapshots, you avoid the messy and inefficient process of manually adjusting dozens of AudioSources via code. It's a clean, powerful system for managing broad changes to your game's soundscape.
Unity's powerful audio system is a big reason it's still a top choice for so many developers. A 2026 GDC survey found that while Unreal Engine is used by 42% of developers, Unity is the engine of choice for a solid 30% and is preferred by 54% of established indie studios. These numbers highlight the engine's staying power, making any good unity audio integration guide an essential resource. You can explore the full report for more industry trends.
If your game has a lot going on—think rapid-fire machine guns or a cascade of collision impacts—you could be triggering hundreds of sounds a second. The naive approach of creating and destroying an AudioSource component for every single effect is a performance killer. It generates constant memory allocation spikes, which are a direct cause of frustrating in-game stuttering.
The pro-level solution here is audio pooling.
Instead of destroying an AudioSource after its sound finishes, you simply deactivate it and return it to a "pool" of ready-to-use sources. The next time you need to play a sound, you just grab an inactive one from the pool, set it up, and hit play. No new instantiation, no garbage collection.
This technique is a lifesaver. It recycles GameObjects instead of churning through them, dramatically cutting down performance overhead. For any game with frequent, repetitive sound effects, pooling isn't just a good idea—it's an absolute must. You can code a simple pooling system yourself, and it can be the single thing that turns a choppy mess into a buttery-smooth experience.
To decide which optimization is right for a given situation, it helps to see them side-by-side. Each method shines in different scenarios, and knowing when to use which is key to a performant game.
| Technique | Best For | Performance Impact | Implementation Complexity |
|---|---|---|---|
| Audio Pooling | Frequent, short-lived SFX (gunshots, impacts) | High (Reduces CPU spikes and garbage collection) | Moderate |
| Clip Pre-loading | Important, non-looping sounds (voice lines, critical cues) | Medium (Avoids load-time stutter on first play) | Low |
| Streaming from Disk | Long audio files (music, ambient tracks) | High (Massively reduces memory usage) | Low |
| Compression Settings | All audio, especially on mobile/web | Varies (Balances file size, memory, and CPU) | Low |
Choosing the right combination of these techniques is fundamental to building a game that not only sounds great but also runs smoothly across all your target platforms. It's a balancing act, but one that pays off immensely in the final product.
We've all been there. Scouring stock sound libraries, trying to find the perfect sound, only to come up short. Maybe it's close but not quite right, locked behind a pricey subscription, or tangled in licensing red tape. It's a frustrating compromise. This is where AI tools like SFX Engine are changing how we work, shifting the process from finding sounds to creating them on demand.
Instead of endlessly searching for a "crunchy sci-fi weapon reload," you can now generate one with a simple text prompt. The real magic here is getting limitless, custom, and royalty-free audio that’s made just for your project. You can iterate on the fly, tweaking parameters to get the exact texture and timing you have in your head.
The whole process is built for speed. You start by just describing the sound you need in plain English. Want something really specific like, "distant alien jungle ambiance with dripping water and a low hum"? Just type it in.
From there, you can dial in the details, giving you a surprising amount of control over the final output. Once you’ve nailed it, you just download the sound effect—usually as a high-quality .wav file.
That file is immediately ready to drop into your Unity project. All the import settings and configuration steps we've already covered apply perfectly. It’s just another asset in your toolbox, ready to be hooked up to an AudioSource and run through your AudioMixer.
This isn't just about making cool, unique sounds; it’s about making the whole production pipeline smoother.
The biggest shift is from being a sound curator to a sound creator. It puts the artistic control directly in your hands, allowing you to craft a sonic identity that is truly unique to your game.
If you want to dig deeper into the creative side of things, our guide on how to generate unique sounds has more detailed examples and tips. This modern approach is a perfect fit for any unity audio integration guide, blending creative freedom with practical, in-engine application. You can even take it a step further and explore modern AI voice generators to bring characters and narration to life.
Let's walk through a real-world scenario. Imagine your game has a magic spell that freezes enemies on the spot. You need a sound that sells both the icy crunch and the magical energy behind it.
First, generate the sound in SFX Engine. You might start with a prompt like "icy crystal formation with a deep magical drone." After generating a few options, you can tweak the crispness of the ice and the intensity of the drone until it feels right.
Next, download and import it. Grab your favorite version as a .wav file and drop it into your Unity project, maybe under _Audio/SFX/Spells/.
Then, configure it for performance. In the Inspector, you'll want to set the sound to Decompress on Load. It's a short, important effect that needs to play instantly without any lag. You'll also want to make sure it's set to Mono so you can spatialize it from the spell's point of origin.
Finally, implement it in-game. Just attach an AudioSource to the spell's particle effect prefab, assign your new AudioClip to it, and call AudioSource.Play() from your spell's script when it's cast.
In just a few minutes, you've gone from an idea in your head to a fully implemented, custom sound effect that you own outright. That direct, creative loop is an incredibly powerful tool for any developer trying to build an immersive audio world without the usual roadblocks.
Even with the best plan, you're going to run into some audio quirks. It’s just part of the development process. Knowing the usual suspects ahead of time can save you a ton of frustration down the line, so let's break down a few of the most common questions I hear from developers.
Think of this as your go-to troubleshooting list. Most audio issues are caused by simple oversights that are easy to fix once you know where to look.
Ah, the classic. This is almost always a build issue. When you're playing in the Unity Editor, it has full access to every file in your project. A final game build, however, is a completely different story—it only packages the assets it thinks you actually need.
The most common reason for this is an audio file that isn't directly referenced in any of the scenes you've included in your build settings. If you’re loading a sound dynamically from a script using Resources.Load, but that AudioClip isn't assigned to a component anywhere, Unity might just decide to leave it out to shrink the game's file size.
An easy way to fix this is to make sure the asset is referenced somewhere, even on an inactive GameObject in your starting scene. Another frequent mistake is forgetting to assign your AudioClip to the AudioSource on a prefab that only gets created at runtime. Always double-check your prefabs!
Nothing breaks immersion like an abrupt sound cutting in or out. Smooth volume transitions are key to a polished experience, whether you're bringing in a background music track or fading out ambient noise as the player enters a new area. Writing a simple script to handle this is a great way to get comfortable with audio control.
You can create a clean fade using a Coroutine in C#. This lets you gradually change an AudioSource's volume over a few seconds without locking up your game's main thread.
// A simple Coroutine to fade in an audio source public IEnumerator FadeIn(AudioSource audioSource, float duration) { float startVolume = 0f; audioSource.volume = startVolume; audioSource.Play();
while (audioSource.volume < 1.0f)
{
    // Increment volume based on the time that's passed
    audioSource.volume += Time.deltaTime / duration;
    yield return null;
}

// Snap to 1.0f to ensure it's at full volume
audioSource.volume = 1.0f;
}
With a small function like this, you have total control. Just call StartCoroutine(FadeIn(myAudioSource, 5.0f)); and your sound will fade in over five seconds. For bigger, game-wide changes, you should look into AudioMixer Snapshots. They have built-in transition timing that's perfect for shifting the entire audio landscape of your game.
Never try to handle fades by just changing the volume in an
Update()loop on its own. It's messy and inefficient. A Coroutine or a dedicated tweening library like LeanTween or DOTween is a much cleaner, more performant approach for handling any value change over time.
Performance is king on mobile, and audio files can eat up memory and storage if you're not careful. When you're building for mobile, compressed formats are your absolute best bet.
Here's my go-to advice:
Whatever you do, avoid using uncompressed .wav files unless you have a very specific reason, like for a tiny, looping sound that plays constantly. While .wav files cost nothing in CPU to play, their massive file size can be a death sentence on devices with limited RAM. It’s a trade-off, and using a little CPU for decompression is almost always a better choice than risking your game crashing on an older phone. Any good unity audio integration guide will hammer this point home: always optimize for your target platform.
Don't let audio production become a roadblock. If you want a truly efficient workflow, you can generate endless, custom, royalty-free sound effects on demand with SFX Engine. Stop hunting through libraries and start creating the exact sounds your project needs—from ambient textures to powerful impacts—all from simple text prompts.